Prerequisites
Start Interactive Demo
To interact with the demo, you will need to first set up a Hedera Testnet account with testnet HBAR. After setting up an account, head to the interactive demo site (tokenization-studio.hedera.com) and connect your wallet: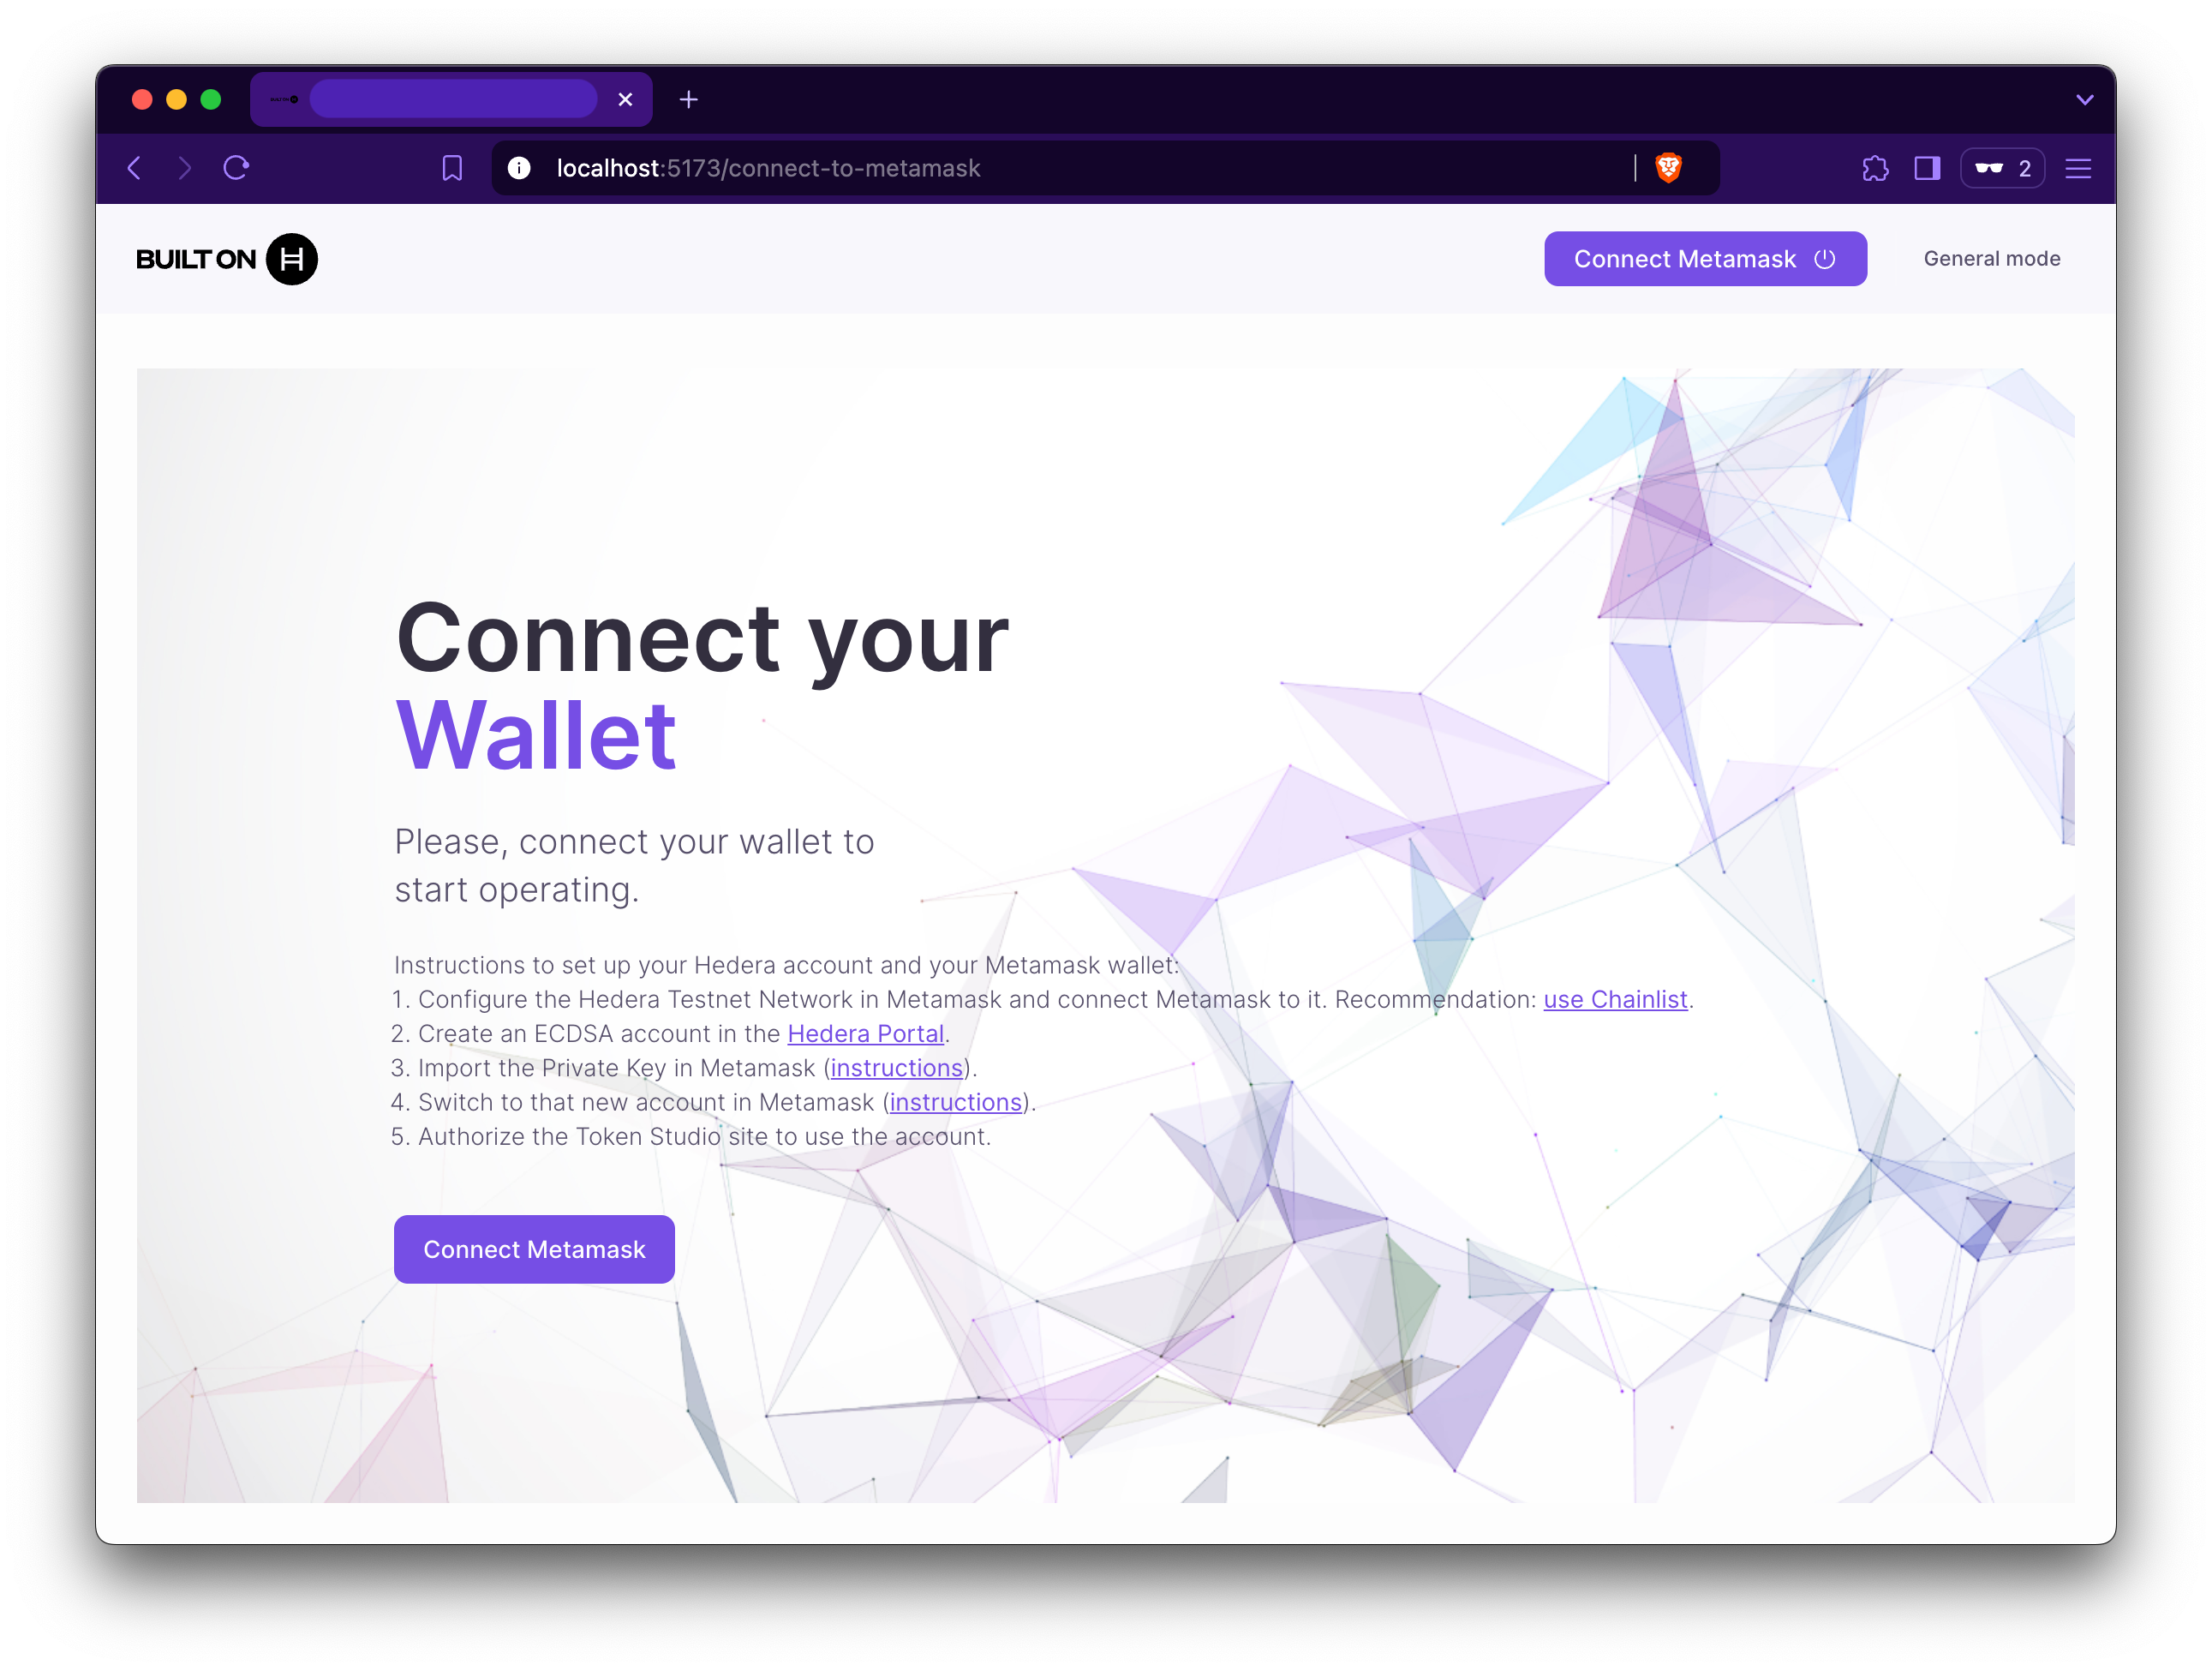
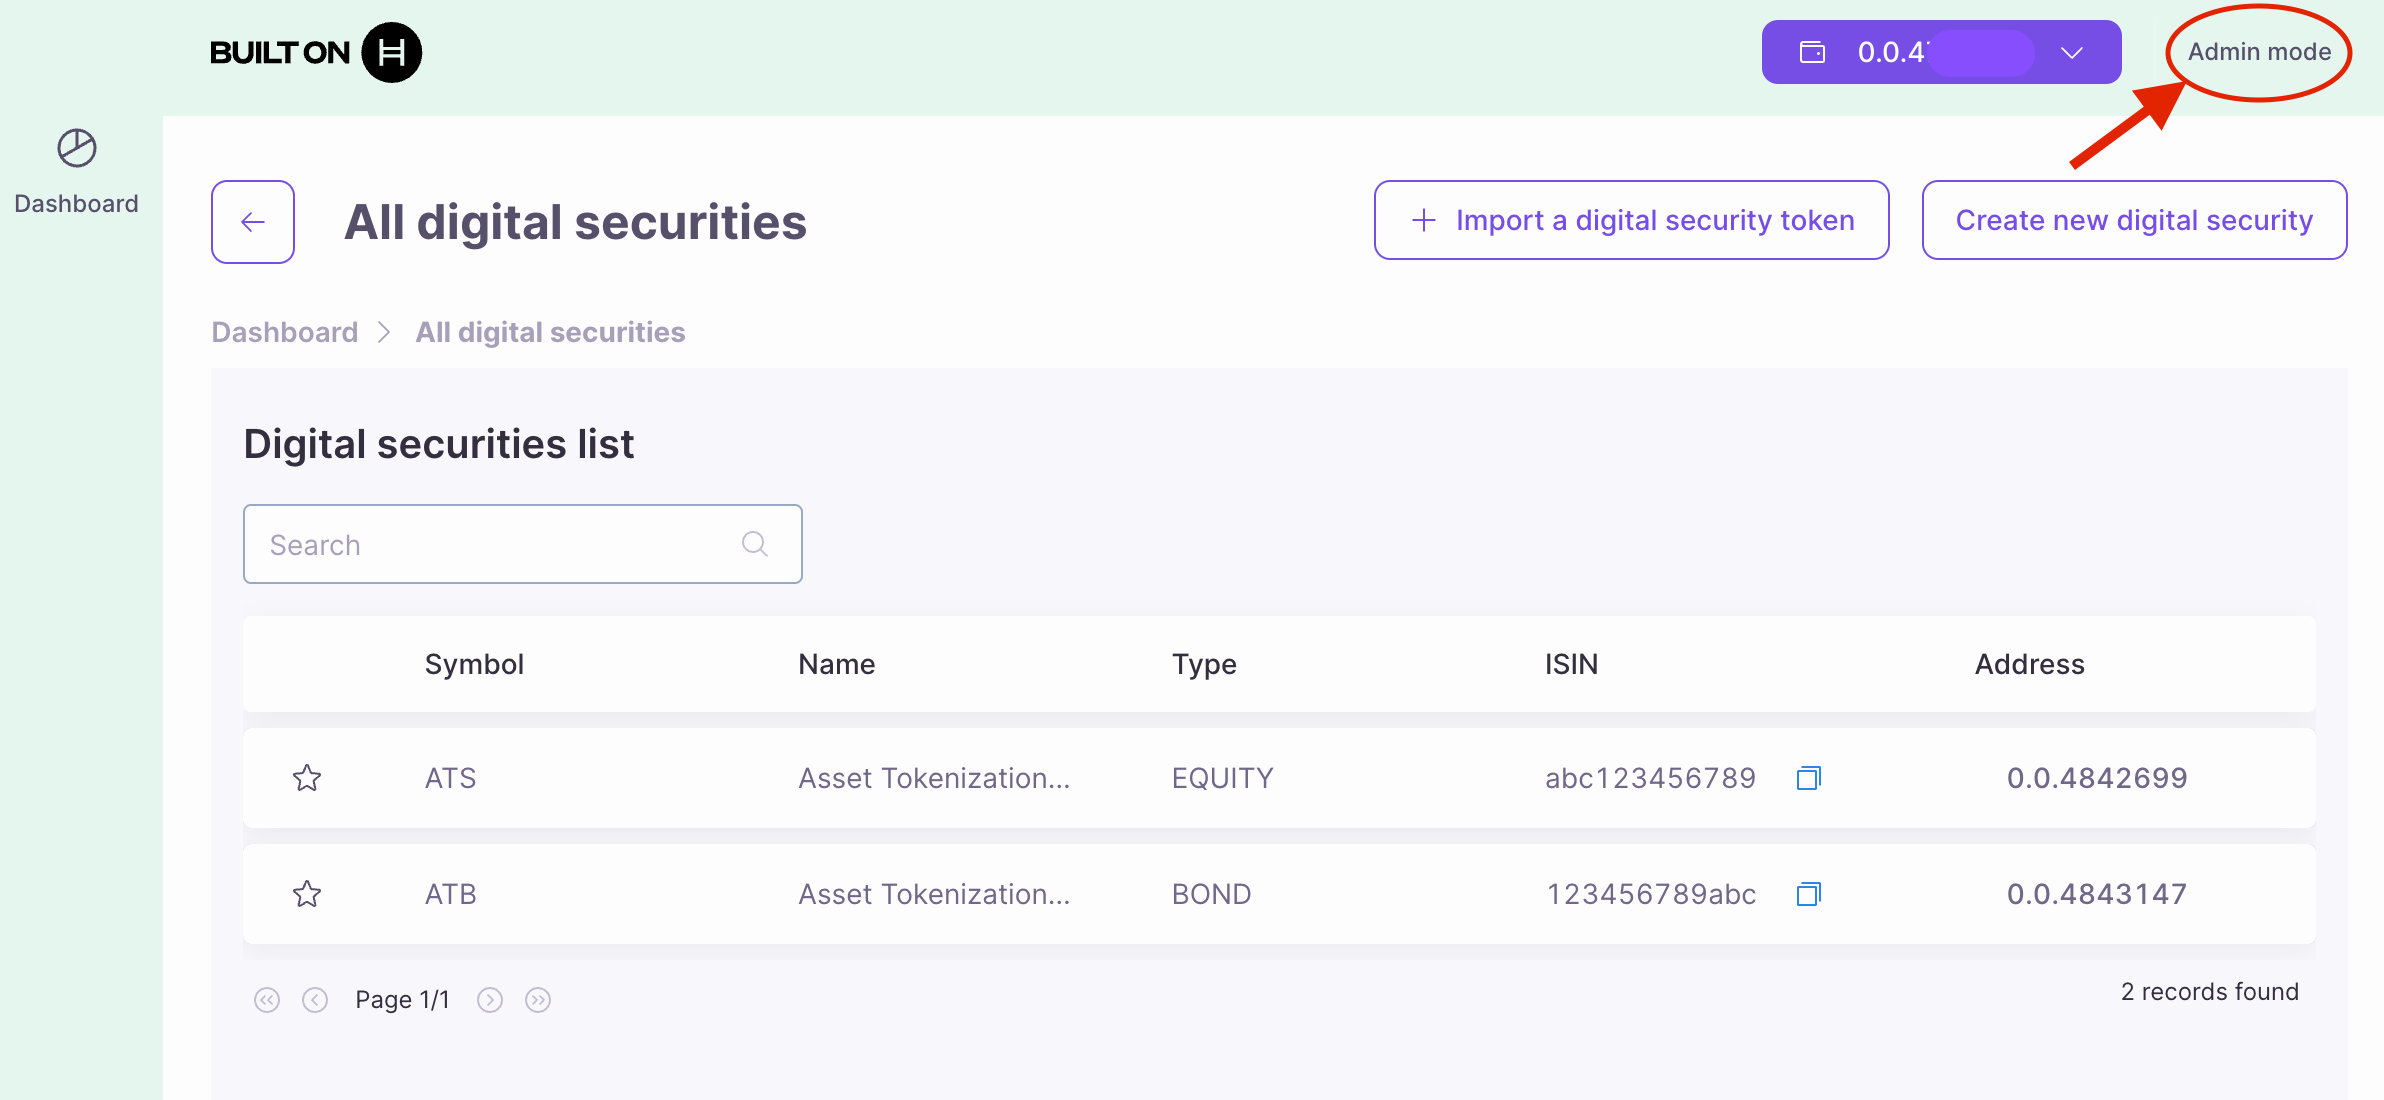
Create New Digital Security
Once your wallet is connected, click “Create new digital security” at the top right of the dashboard.
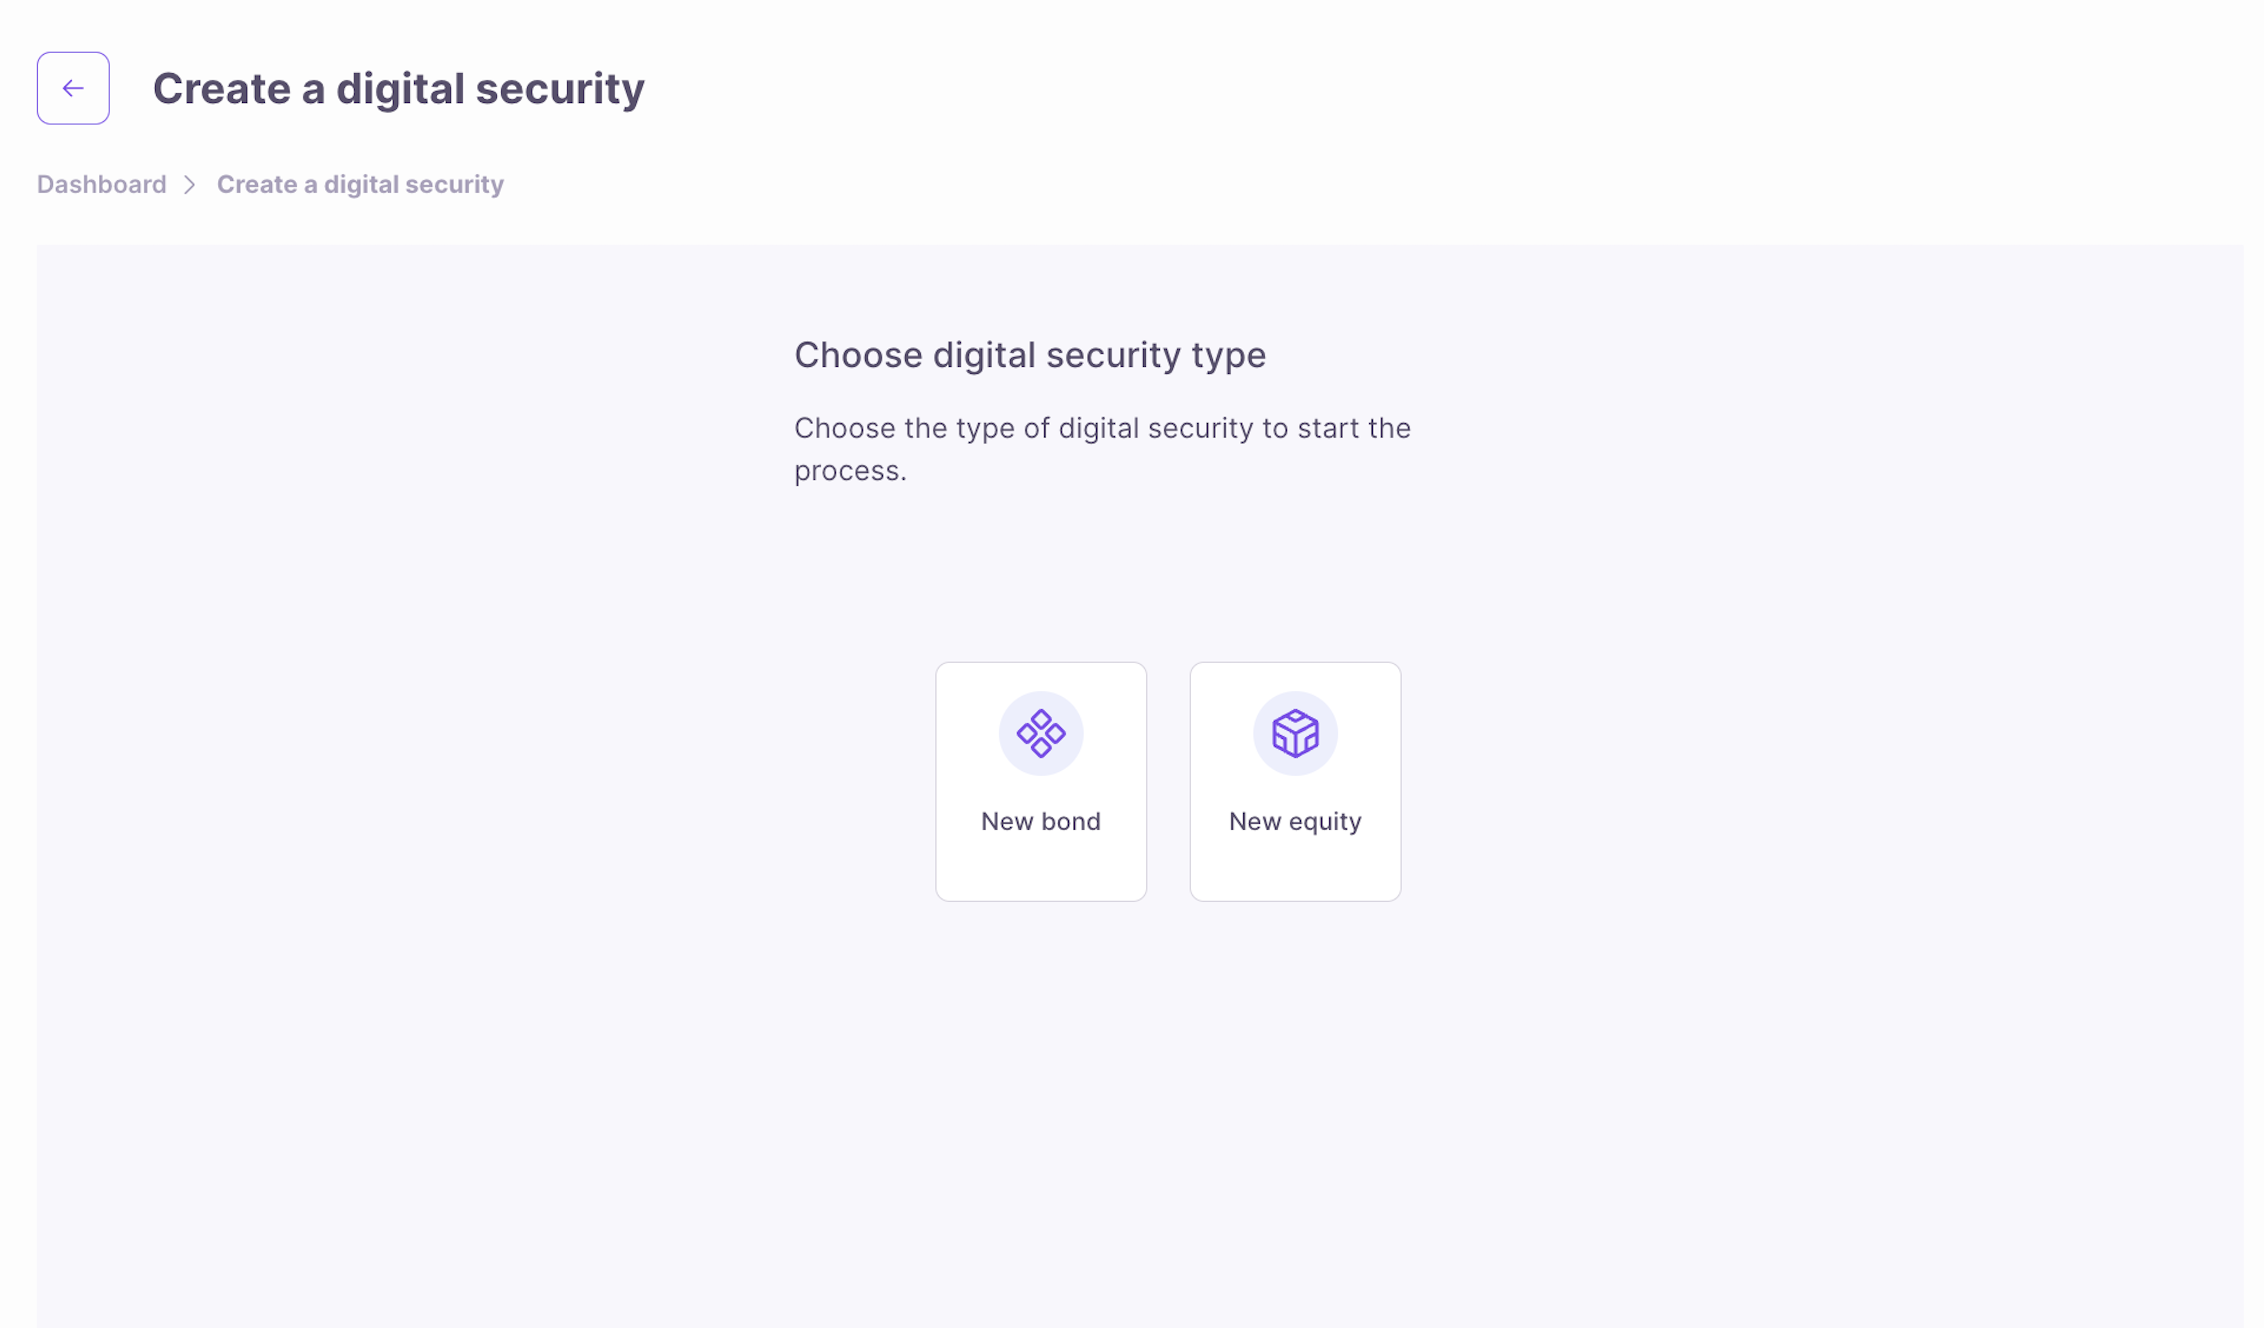
Digital Security Type
Choose the type of digital security to start the tokenization process and follow along.Asset Types

Create New Bond
New bonds are debt securities issued by entities (corporate or government) to raise money. Investors receive periodic interest (coupons) and the principal at maturity. Tokenizing a bond digitally represents it on the blockchain or other form of distributed ledger, allowing fractional ownership and easier transferability of tokens.

Create New Equity
New equity represents ownership in a company or asset, entitling holders to a share of assets, profits, dividends, and voting rights. Through asset tokenization, digital tokens representing shares are issued on a blockchain or other form of distributed ledger, offering investors easy access, transferability, and voting rights.
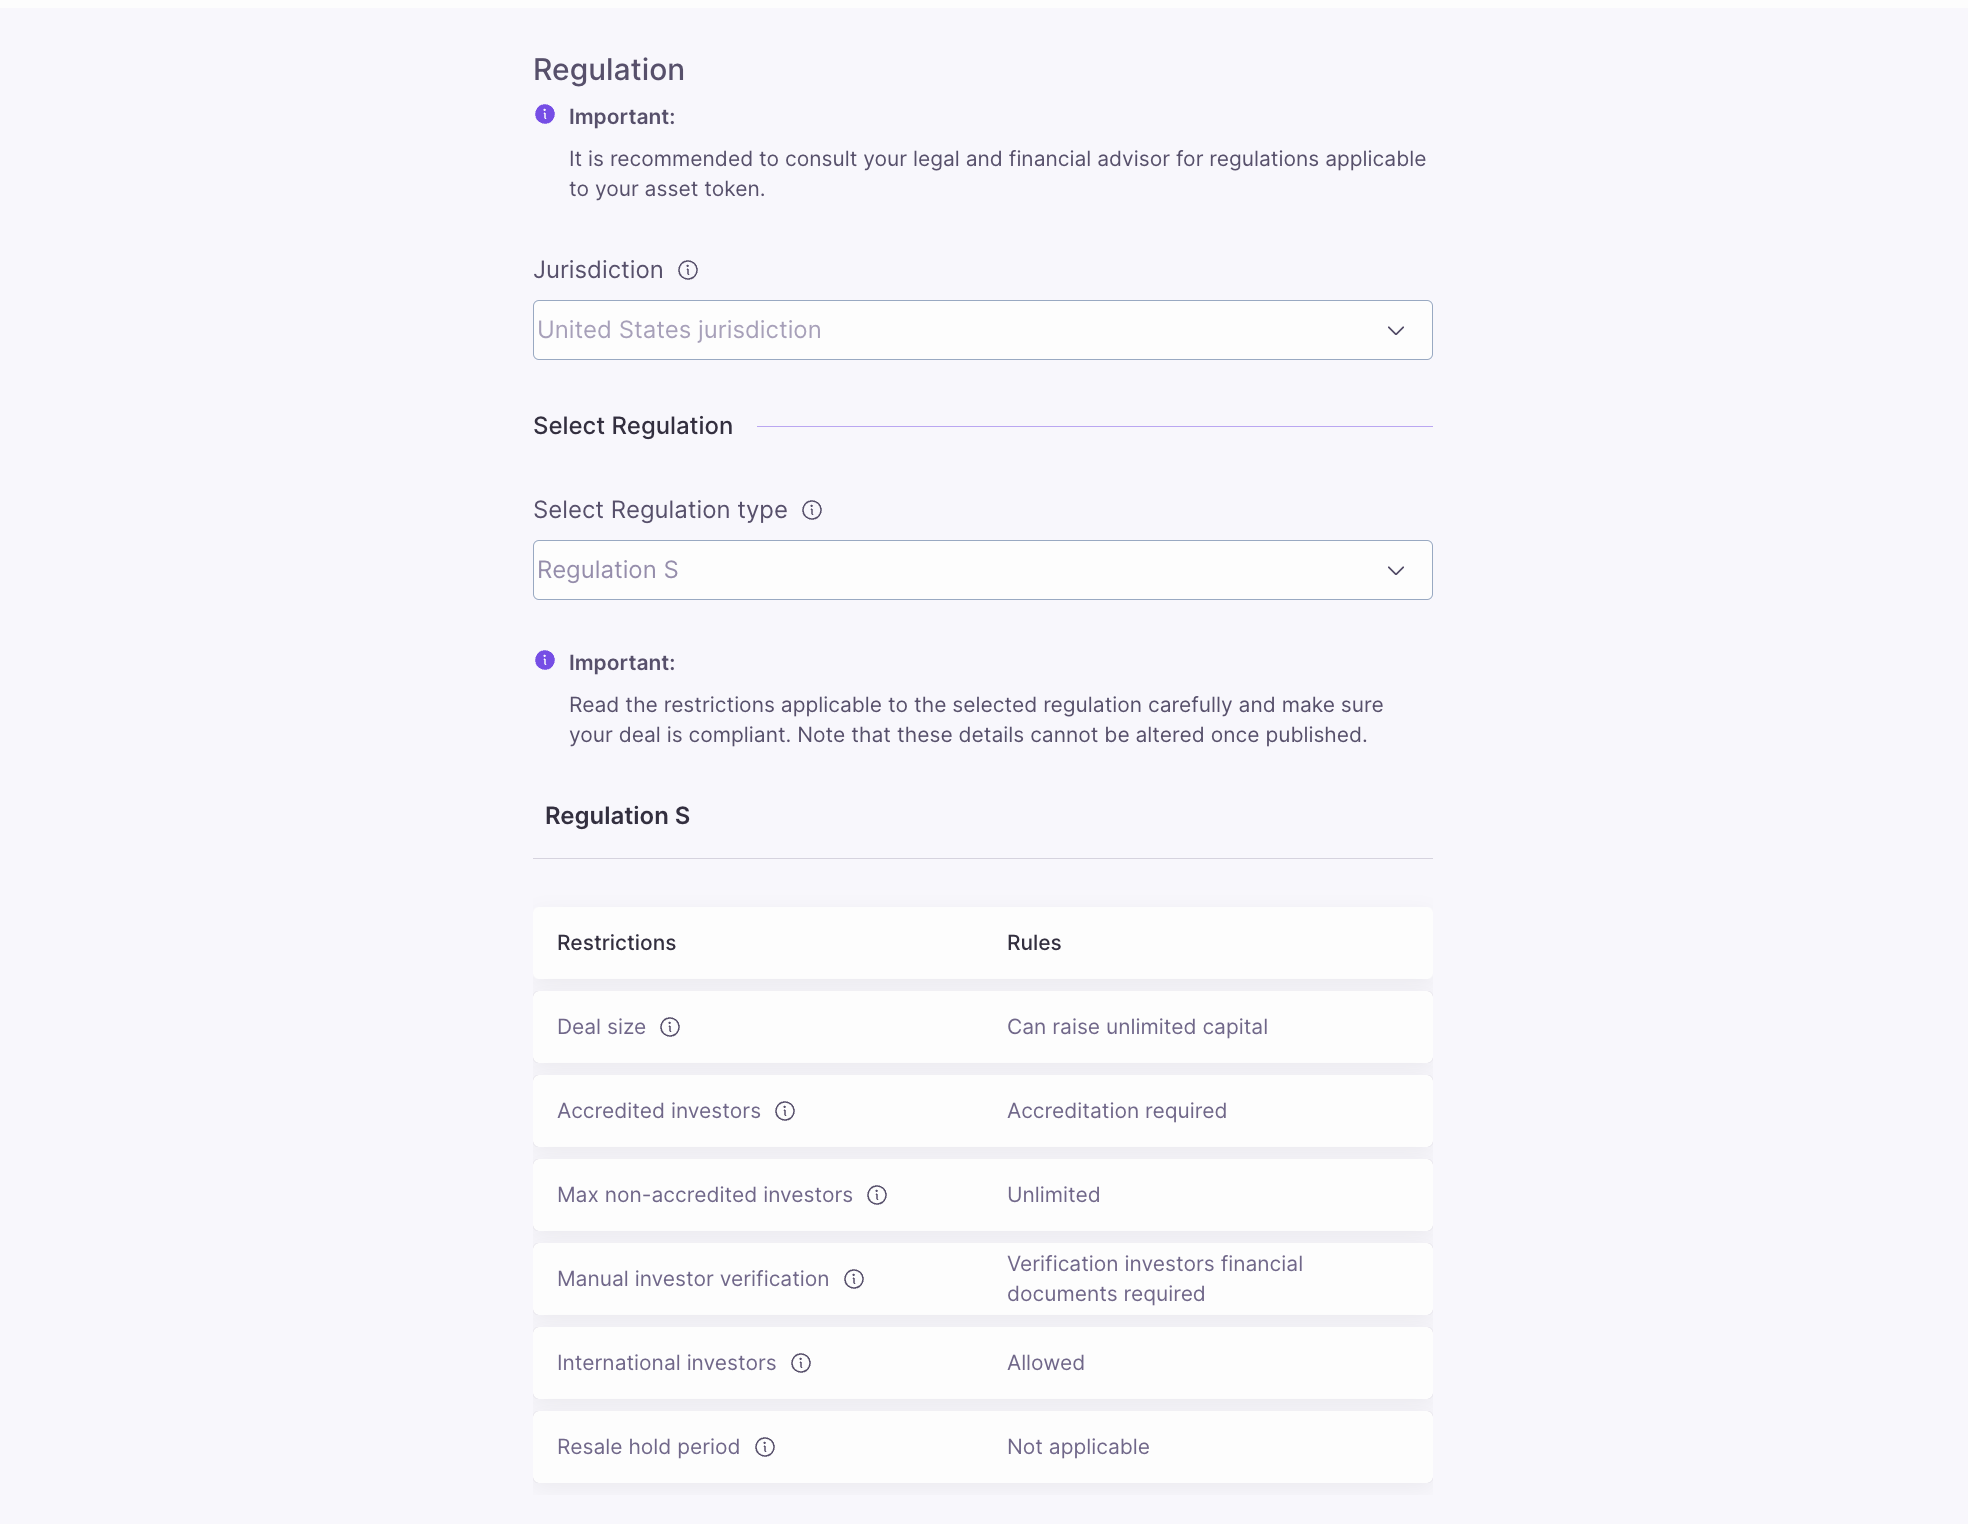
Regulations
Before we start tokenizing assets into digital securities, let’s review some important regulatory information to understand the applicable restrictions and rules for both types (bonds and equities) of securities that ATS supports. The current jurisdiction for digital securities is limited to the United States, meaning all legal and regulatory frameworks concerning the issuance, management, and trading of the tokenized asset are in conformity with U.S. laws. While designed to be flexible for more jurisdictions in the near future, for the time being, all the offerings of tokenized instruments shall fall under the ambit of American laws.Restrictions and Rules
Regulation S
Regulation S
- Deal Size: Can raise unlimited capital.
- Accredited Investors: Accreditation required.
- Max Non-Accredited Investors: Unlimited
- Manual Investor Verification: Verification of investor’s financial documents required.
- International Investors: Allowed.
- Resale Hold Period: Not applicable.
Regulation D (506 B)
Regulation D (506 B)
Restrictions and Rules
- Deal Size: Can raise unlimited capital.
- Accredited Investors: Accreditation required.
- Max Non-Accredited Investors: 35.
- Manual Investor Verification: Manual verification of the investor’s financial documents is required.
- International Investors: Not allowed.
- Resale Hold Period: Applicable from 6 months to 1 year.
Regulation D (506 C)
Regulation D (506 C)
Restrictions and Rules
- Deal Size: Can raise unlimited capital.
- Accredited Investors: Accreditation required.
- Max Non-Accredited Investors: Unlimited.
- Manual Investor Verification: Manual verification of the investor’s financial documents is required.
- International Investors: Not allowed.
- Resale Hold Period: Applicable from 6 months to 1 year.
Regulation Terms Defined
Regulation Terms Defined
- Deal Size: The total amount of capital that can be raised through this offering. This could represent an unlimited or capped amount, depending on the specific tokenization project or regulatory constraints.
- Accredited Investors: Investors who meet specific financial criteria (e.g., income, net worth) as defined by regulatory standards. Participation in certain tokenized offerings may be restricted to accredited investors due to regulatory requirements.
- Max Non-Accredited Investors: The maximum number of non-accredited investors allowed to participate in the digital security offering. Digital securities may impose limits on non-accredited investor participation to comply with securities regulations, ensuring the offering remains within certain legal frameworks.
- Manual Investor Verification: This is a process where investors must provide financial documentation or proof of identity, which is manually verified to ensure compliance with KYC (Know Your Customer) and AML (Anti-Money Laundering) regulations. In digital securities offerings, this step ensures that only eligible participants can invest in the asset.
- International Investors: Refers to the participation of investors from other countries in the digital security offering. Tokenized offerings may allow or restrict international investors based on local or international regulations, tax considerations, and compliance requirements.
- Resale Hold Period: The minimum time an investor must wait before they can resell their digital security on secondary markets. The resale hold period is often mandated by regulatory bodies to prevent early liquidation and to comply with securities laws, ensuring the stability and legality of the offering.
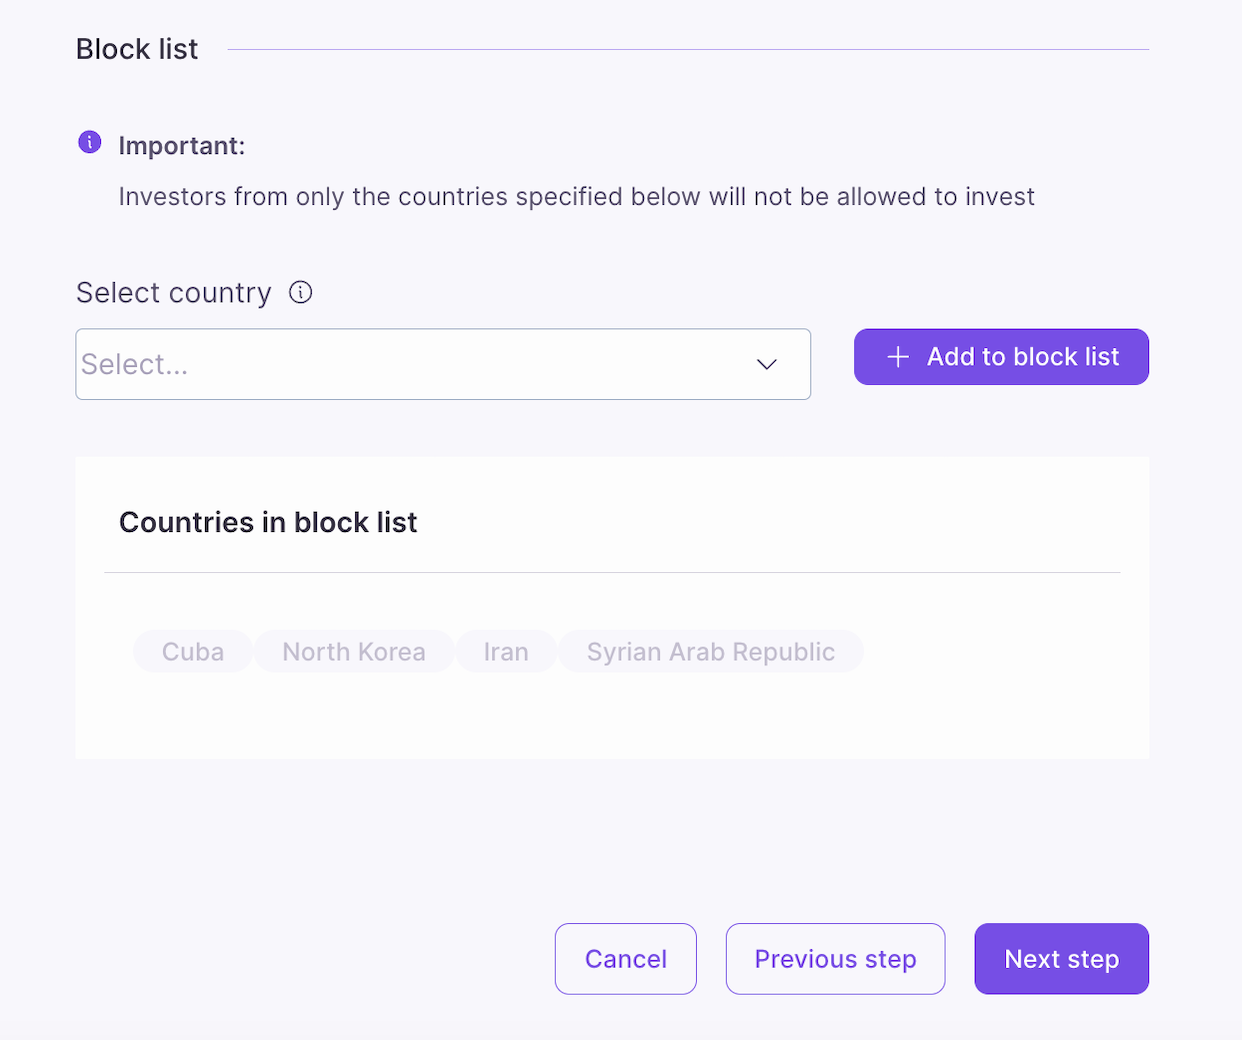
Blocklist
The blocklist is responsible for prohibiting specific investors from participating in a tokenized offering. Investors from the countries mentioned on this blocklist would not be able to invest in the digital security. This functionality allows an issuer to adhere to particular legal, regulatory, or operational constraints applied to specific jurisdictions. For this, the issuer can select a country and then blocklist it to ensure that residents of that country do not create or participate in an offering.Important: Investors from only the countries specified below will not be allowed to invest.
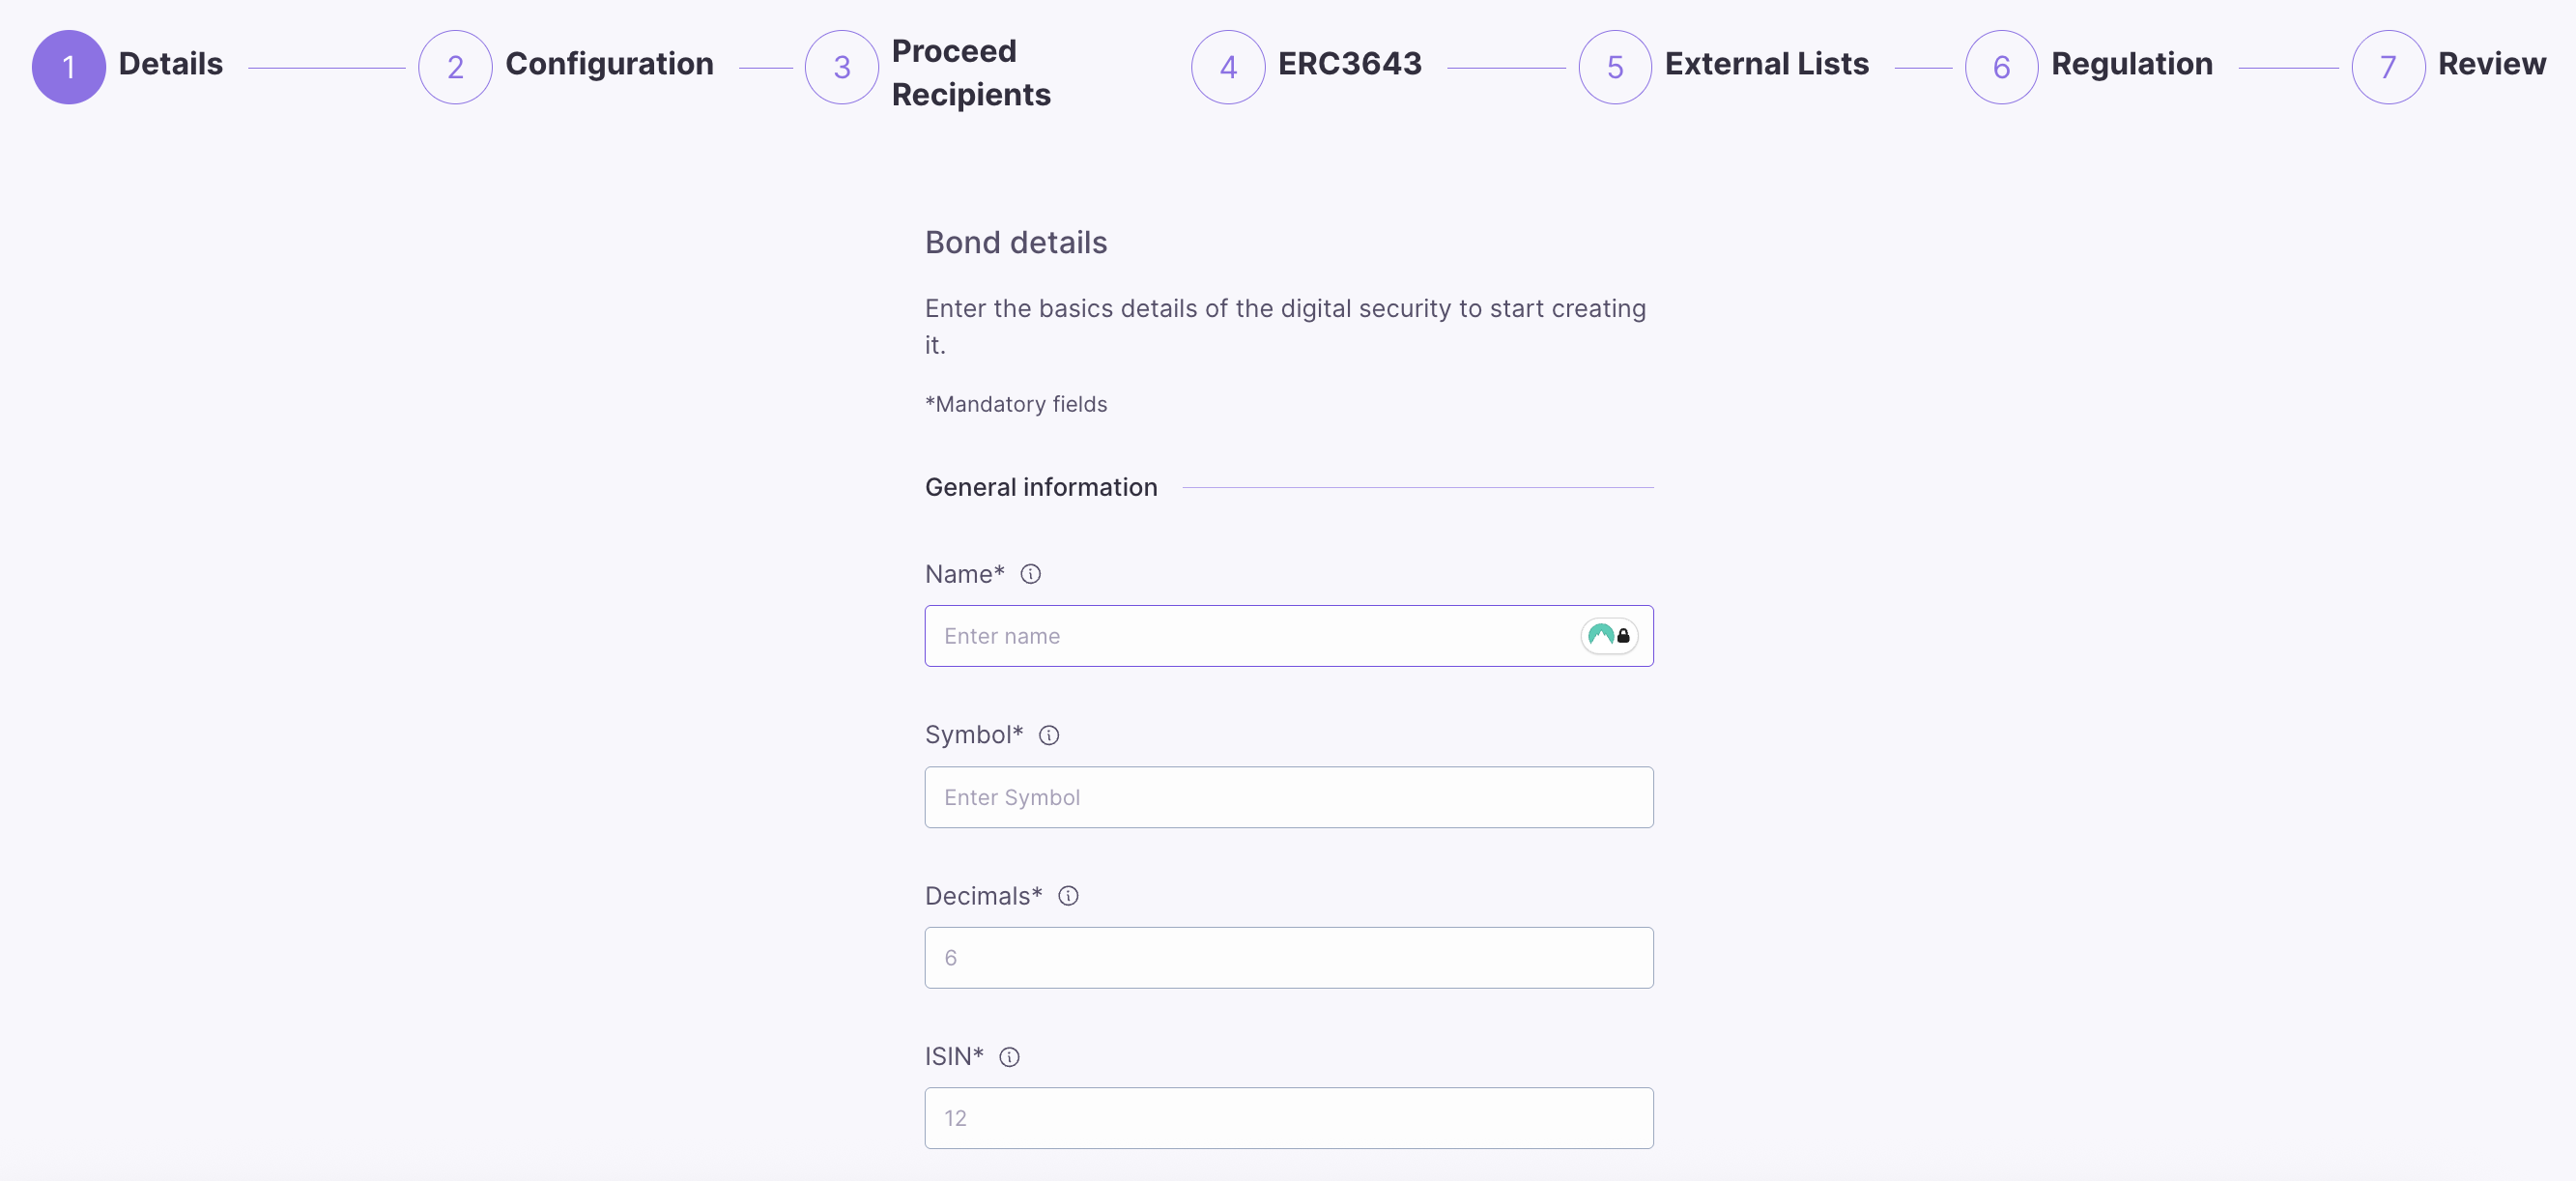
Create New Bond
Bond General Information
To initiate the creation of a new bond, choose New Bond and enter the basic details of the new bond:- Name: Bond’s name.
- Symbol: Bond’s symbol.
- Decimals: Number of decimals units (default is 6).
- ISIN: International Security Identification Number - this can be any 12 alphanumeric characters.
Bond Permissions
Toggle the permissions you want to enable for your new bond:- Controllable: Enables token controller role and compliance operations.
- Blocklist: Enables access control to the security using a list of blocked accounts.
- Approval list: Enables access control to the security using a list of approved/allowed accounts.
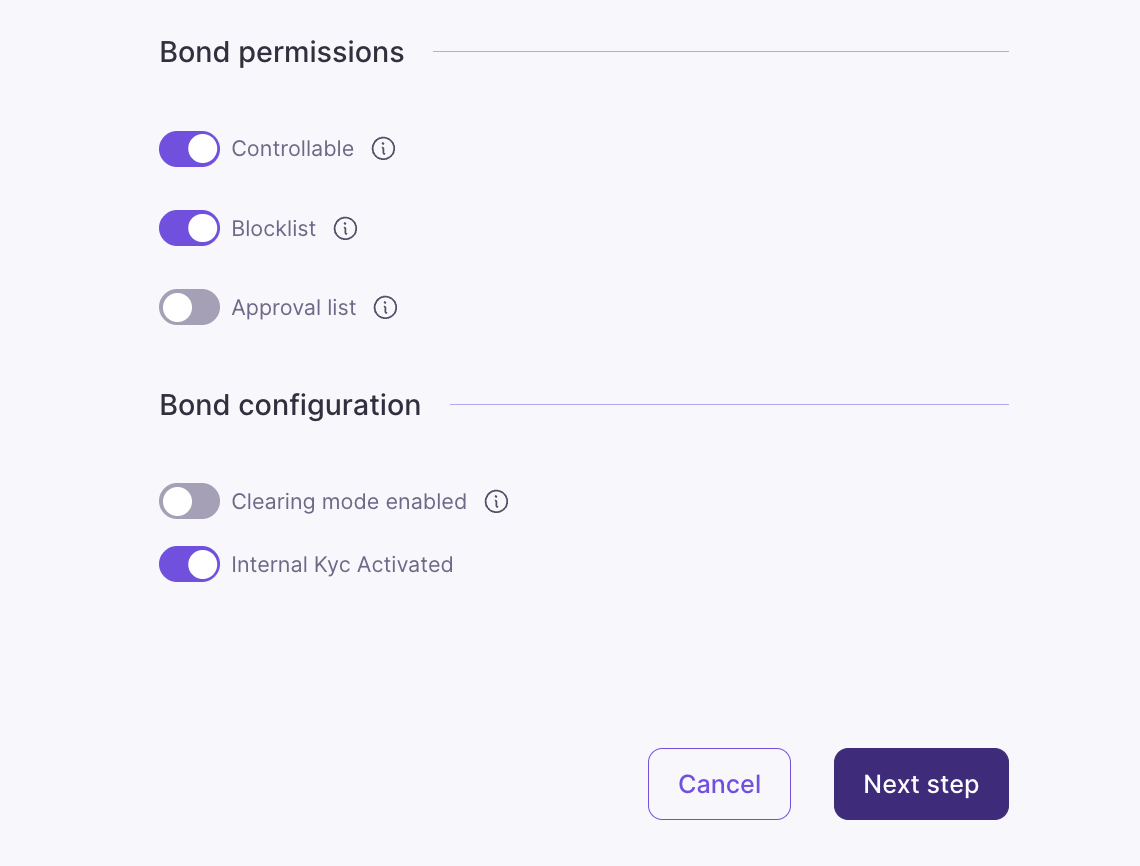
Bond Configuration
- Clearing Mode: (Default: Unchecked)
- What it does: Enables two-step settlement requiring validator approval
- How it works:
- User initiates transfer/redemption/hold – Operation created (pending)
- Clearing Validator reviews operation – Approves or Cancels
- If approved – operation executes
- If cancelled/expired – User can reclaim tokens
- Internal KYC Activated
- What it does: Simplified KYC system without external dependencies
- How it works:
- KYC managed directly within the token contract
- No need for External KYC List contracts
- SSI Manager grants/revokes KYC
- Requires VC files for compliance tracking
- Impact: KYC managed in token vs separate contract
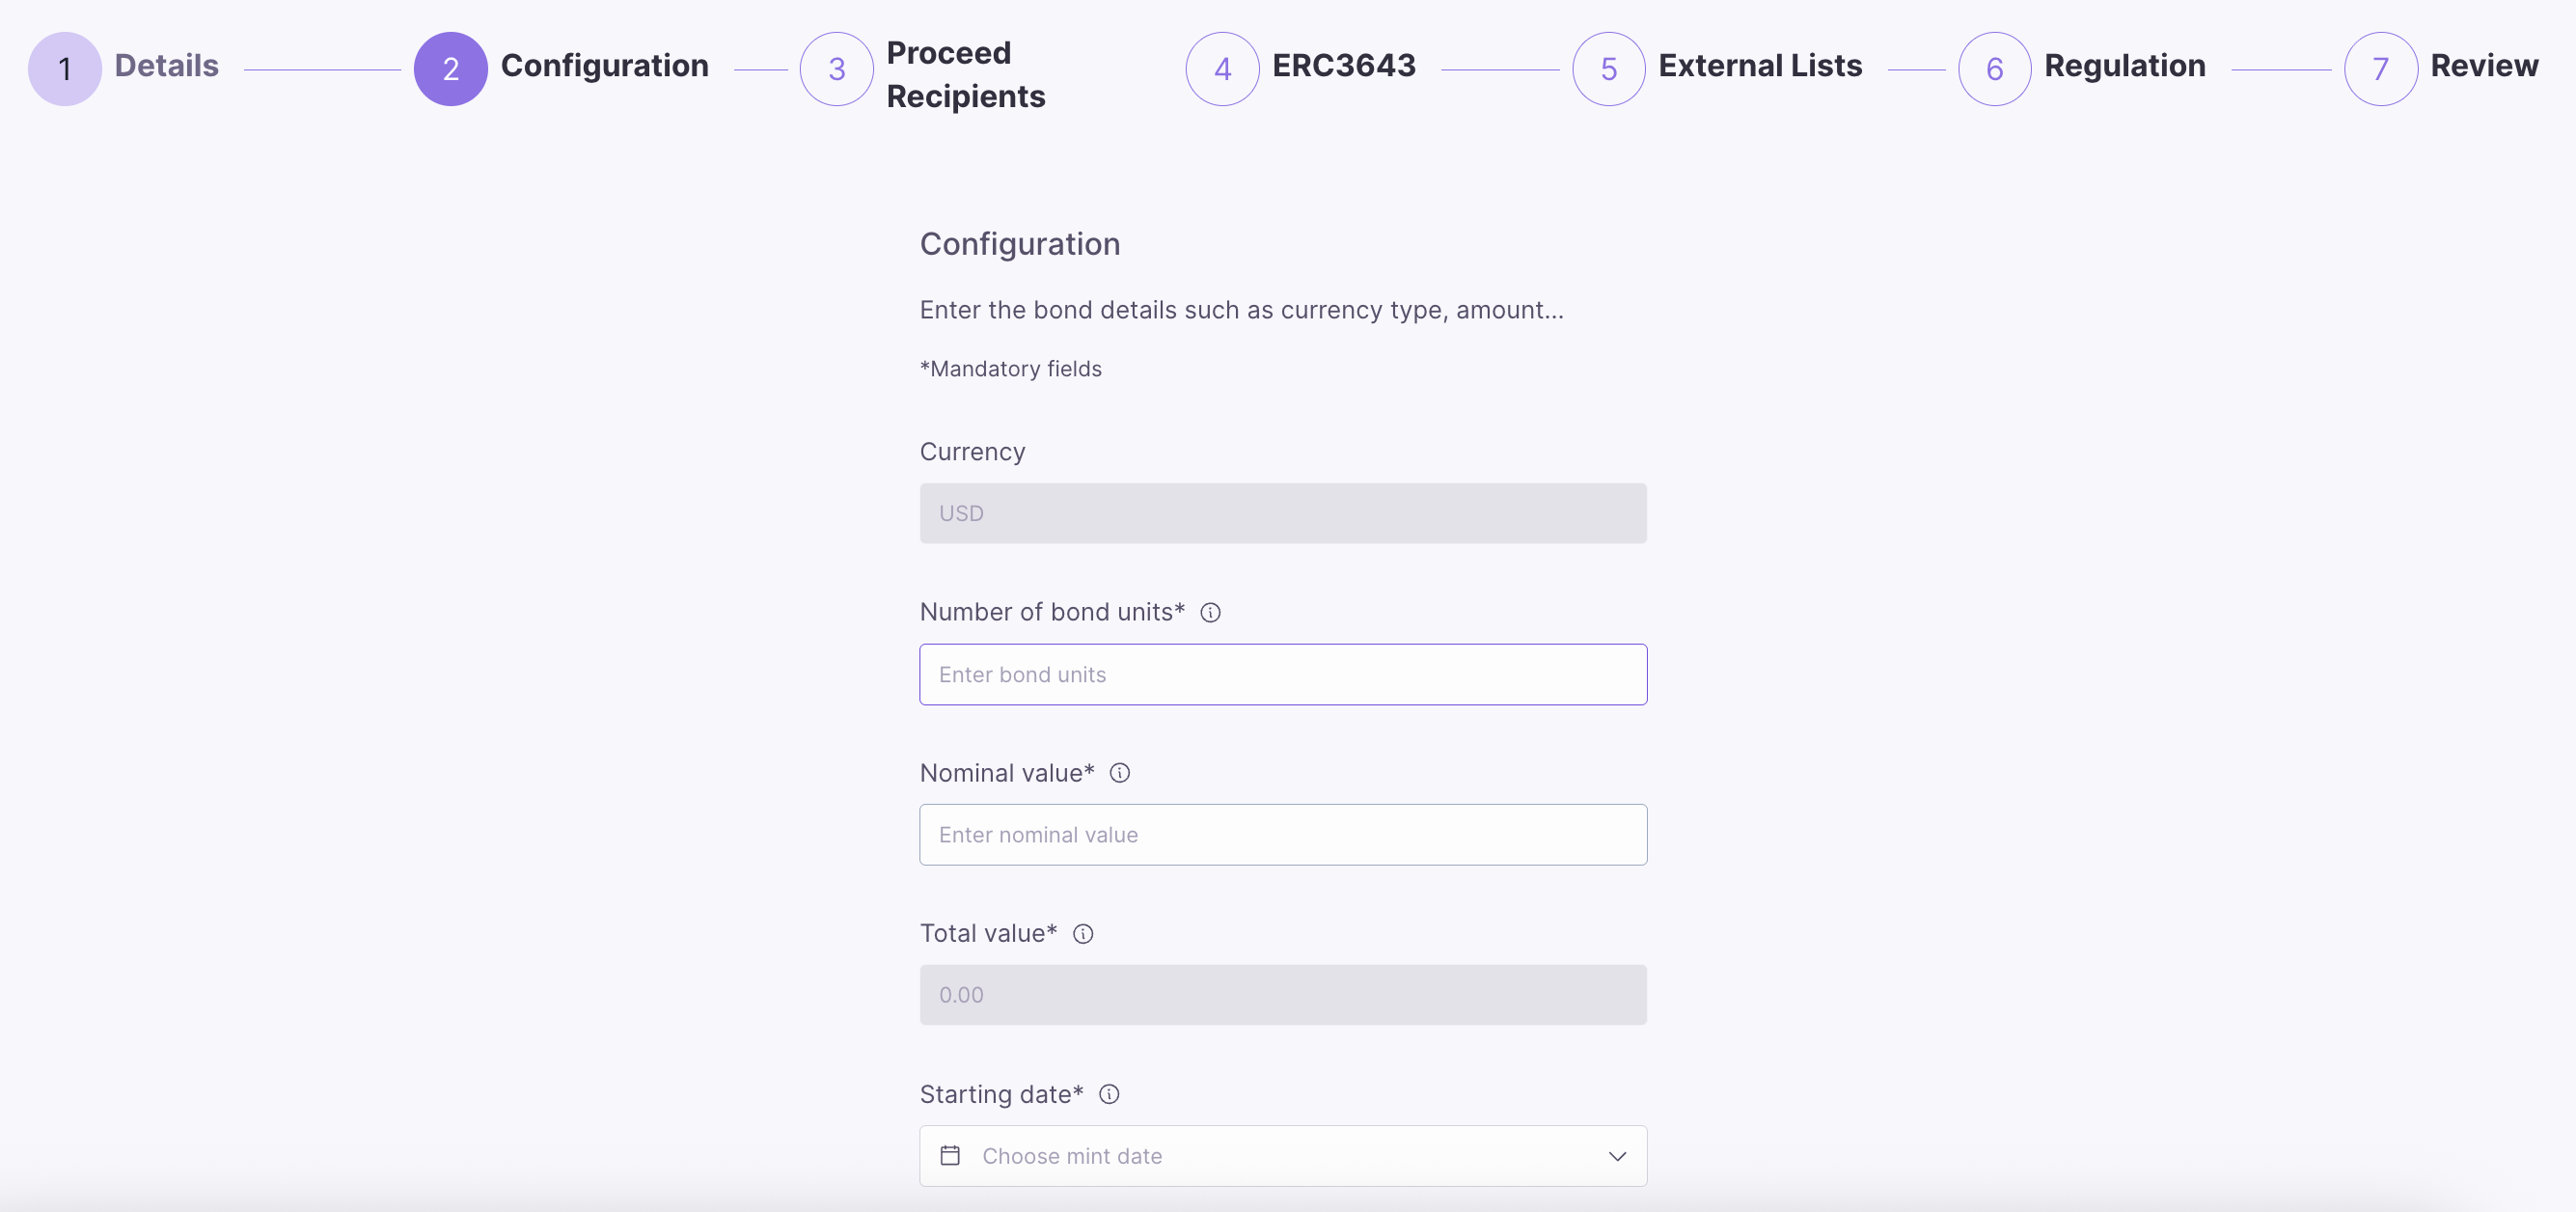
Bond Details
Enter the bond details, such as the nominal value, number of bond units, starting (mint) date, and maturity date.- Number of Bond Units: The total number of bond tokens to be issued. Each unit represents a fraction of the overall bond and can be bought, sold, or transferred.
- Nominal Value: The face value of each bond unit, which is the amount the issuer agrees to repay the bondholder at maturity.
- Starting Date: The issuance or minting date of the bond, marking the official start of the bond’s term. It is the date from which interest (coupon) payments start to accrue.
- Maturity Date: The date when the bond reaches its full term, and the issuer is obligated to repay the bondholders the nominal value of the bond units, along with any remaining interest payments.
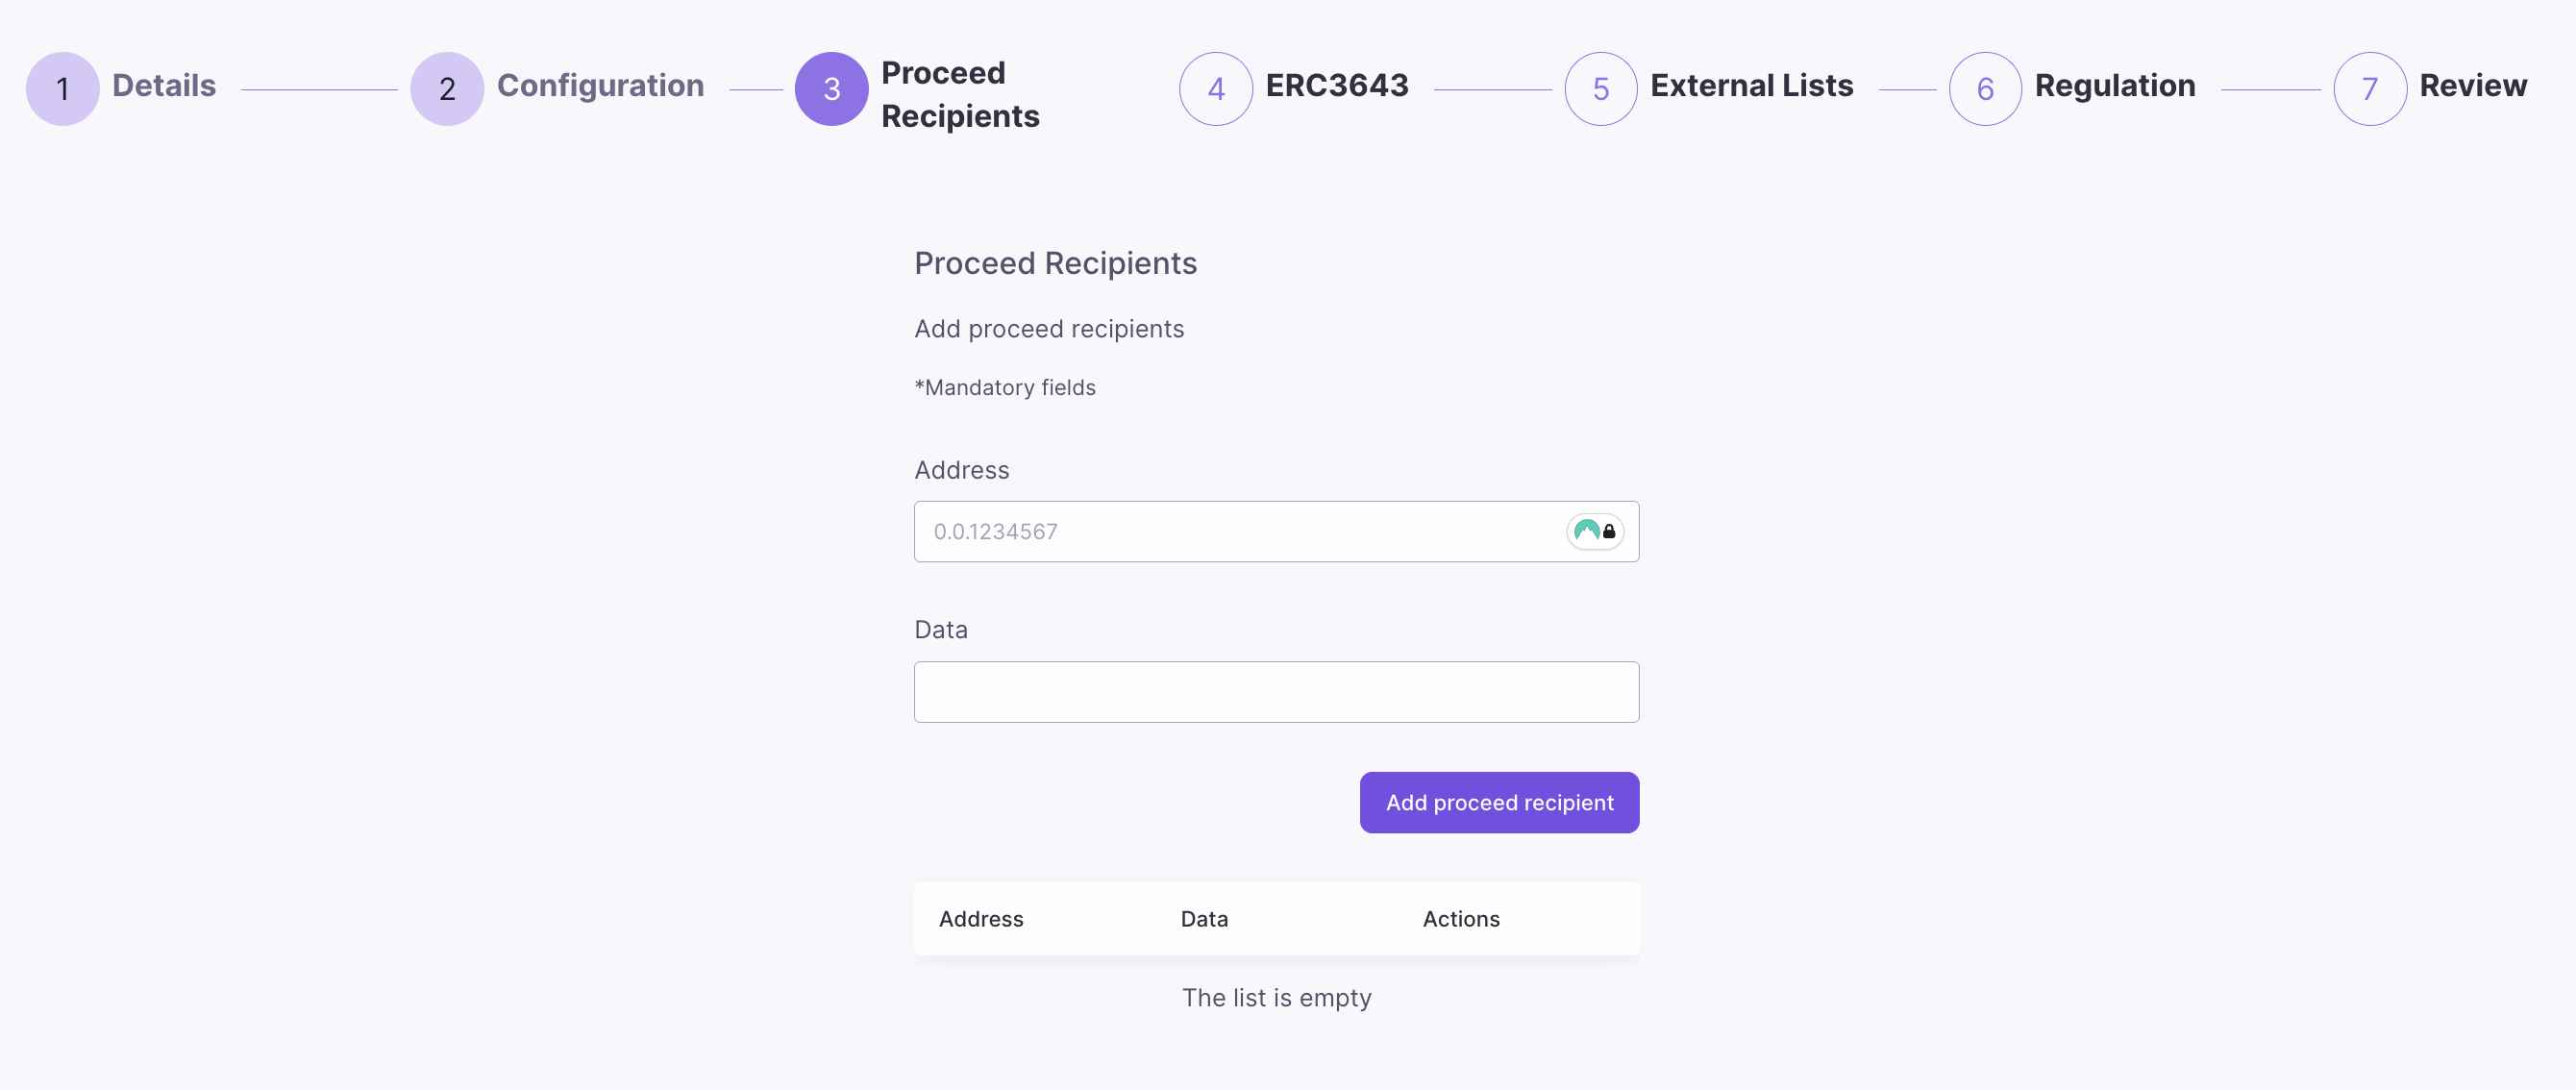
Proceed Recipients
Define the recipients who will receive the bond proceeds from the offering. This step allows you to specify one or more Hedera accounts that will receive the funds raised from the bond issuance.- Address: The Hedera account ID of the recipient who will receive bond proceeds. This must be a valid Hedera account ID format.
- Data: Optional additional data or notes associated with the recipient for record-keeping purposes.
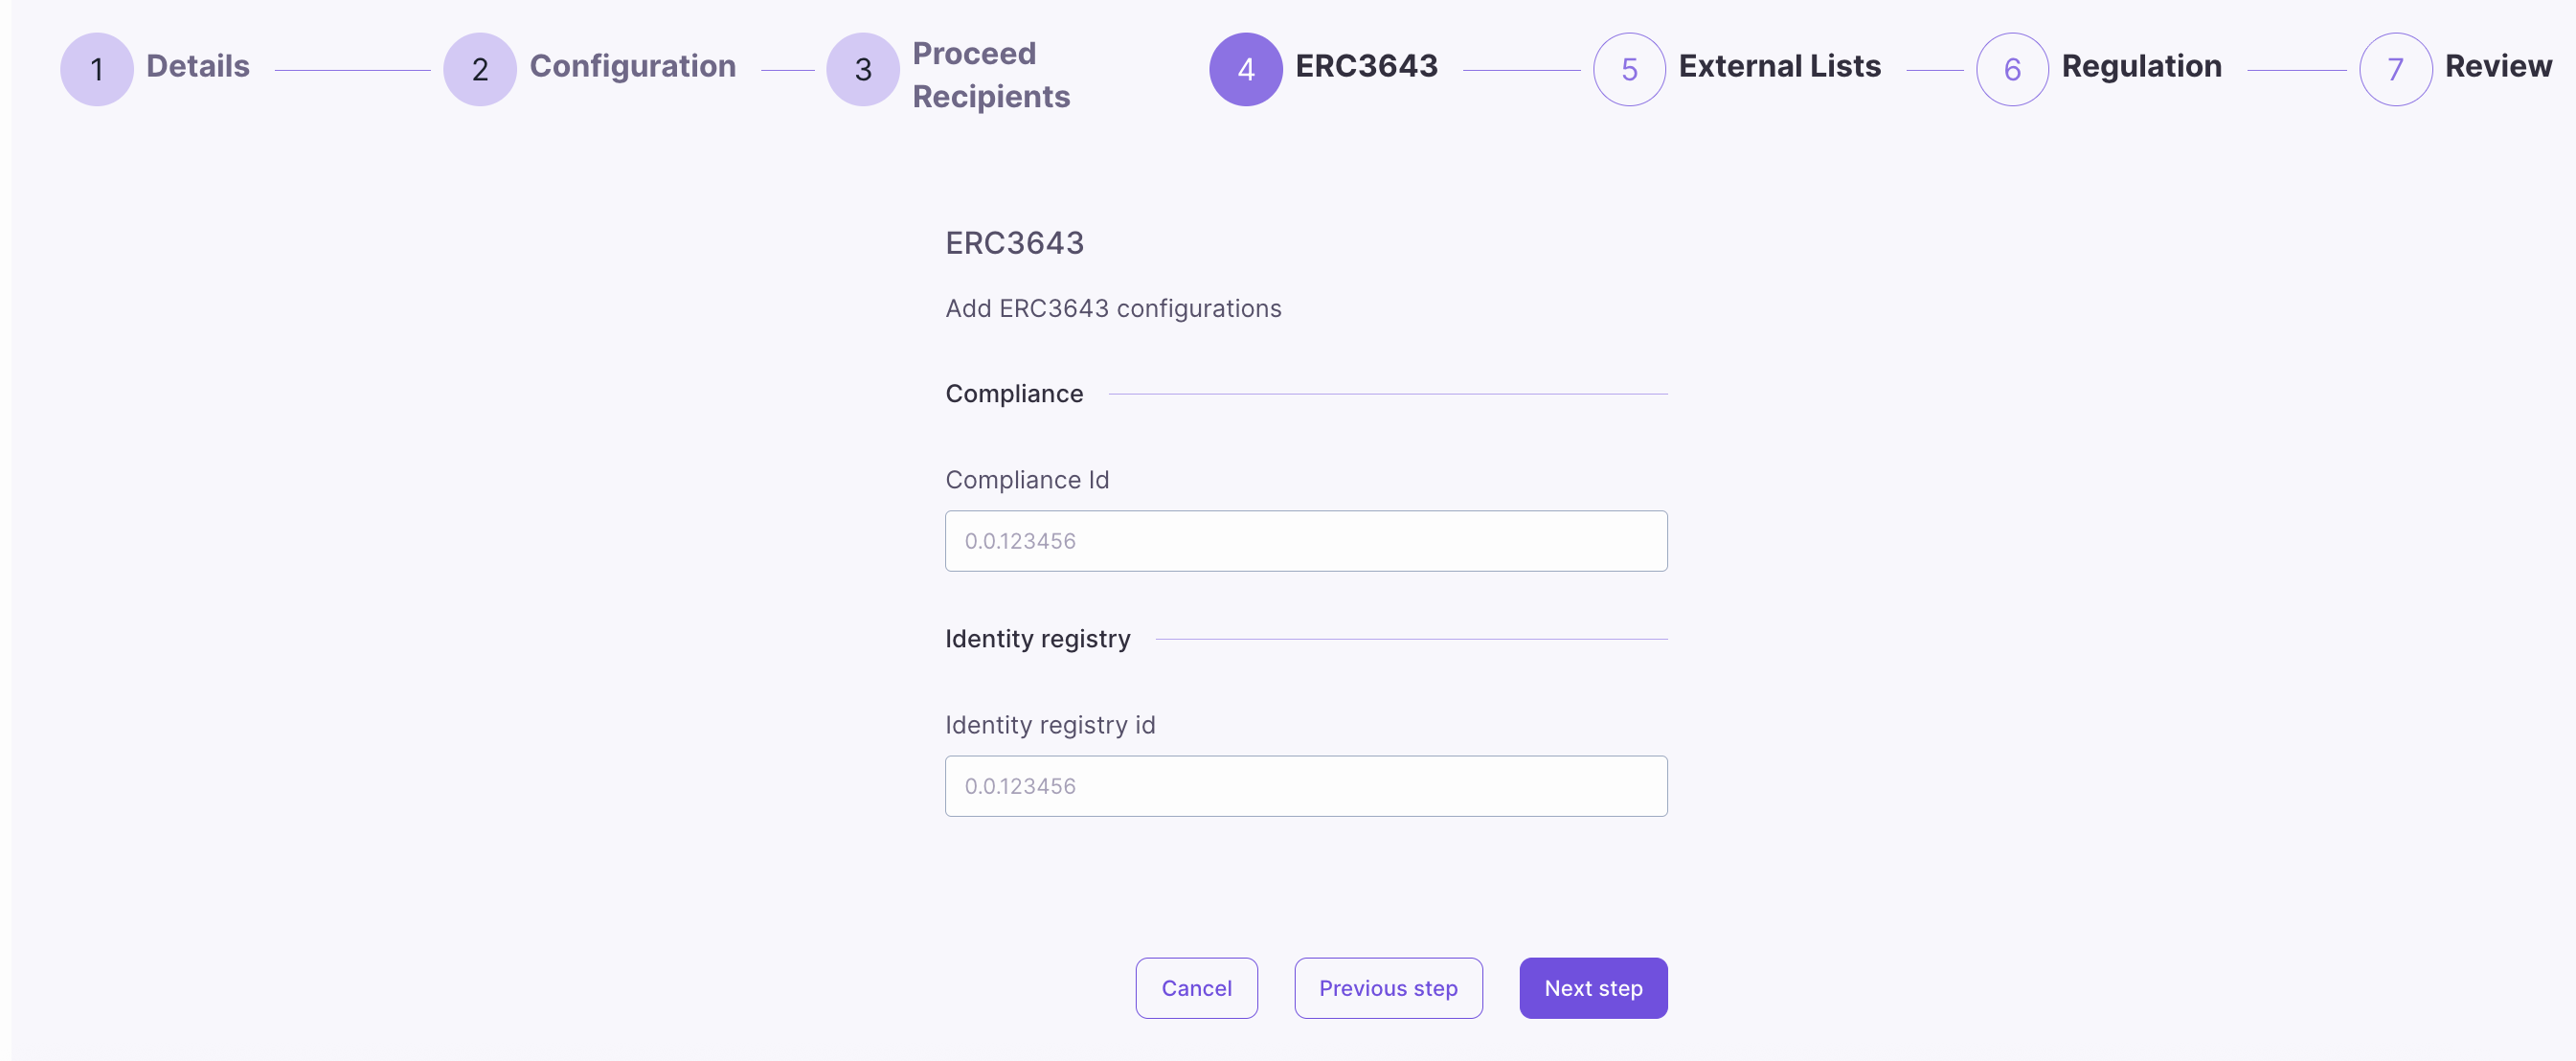
ERC-3643
Configure ERC-3643 compliance settings for your bond. ERC-3643 is a standard for permissioned tokens that enables compliance with securities regulations through on-chain compliance rules and identity verification.- Compliance ID: The Hedera account ID of the compliance smart contract that will enforce the regulatory rules for this bond. This is optional and can be left empty if not using ERC-3643 compliance.
- Identity Registry ID: The Hedera account ID of the identity registry contract that manages investor identities and their compliance status. This is optional and can be left empty if not using ERC-3643 identity management.
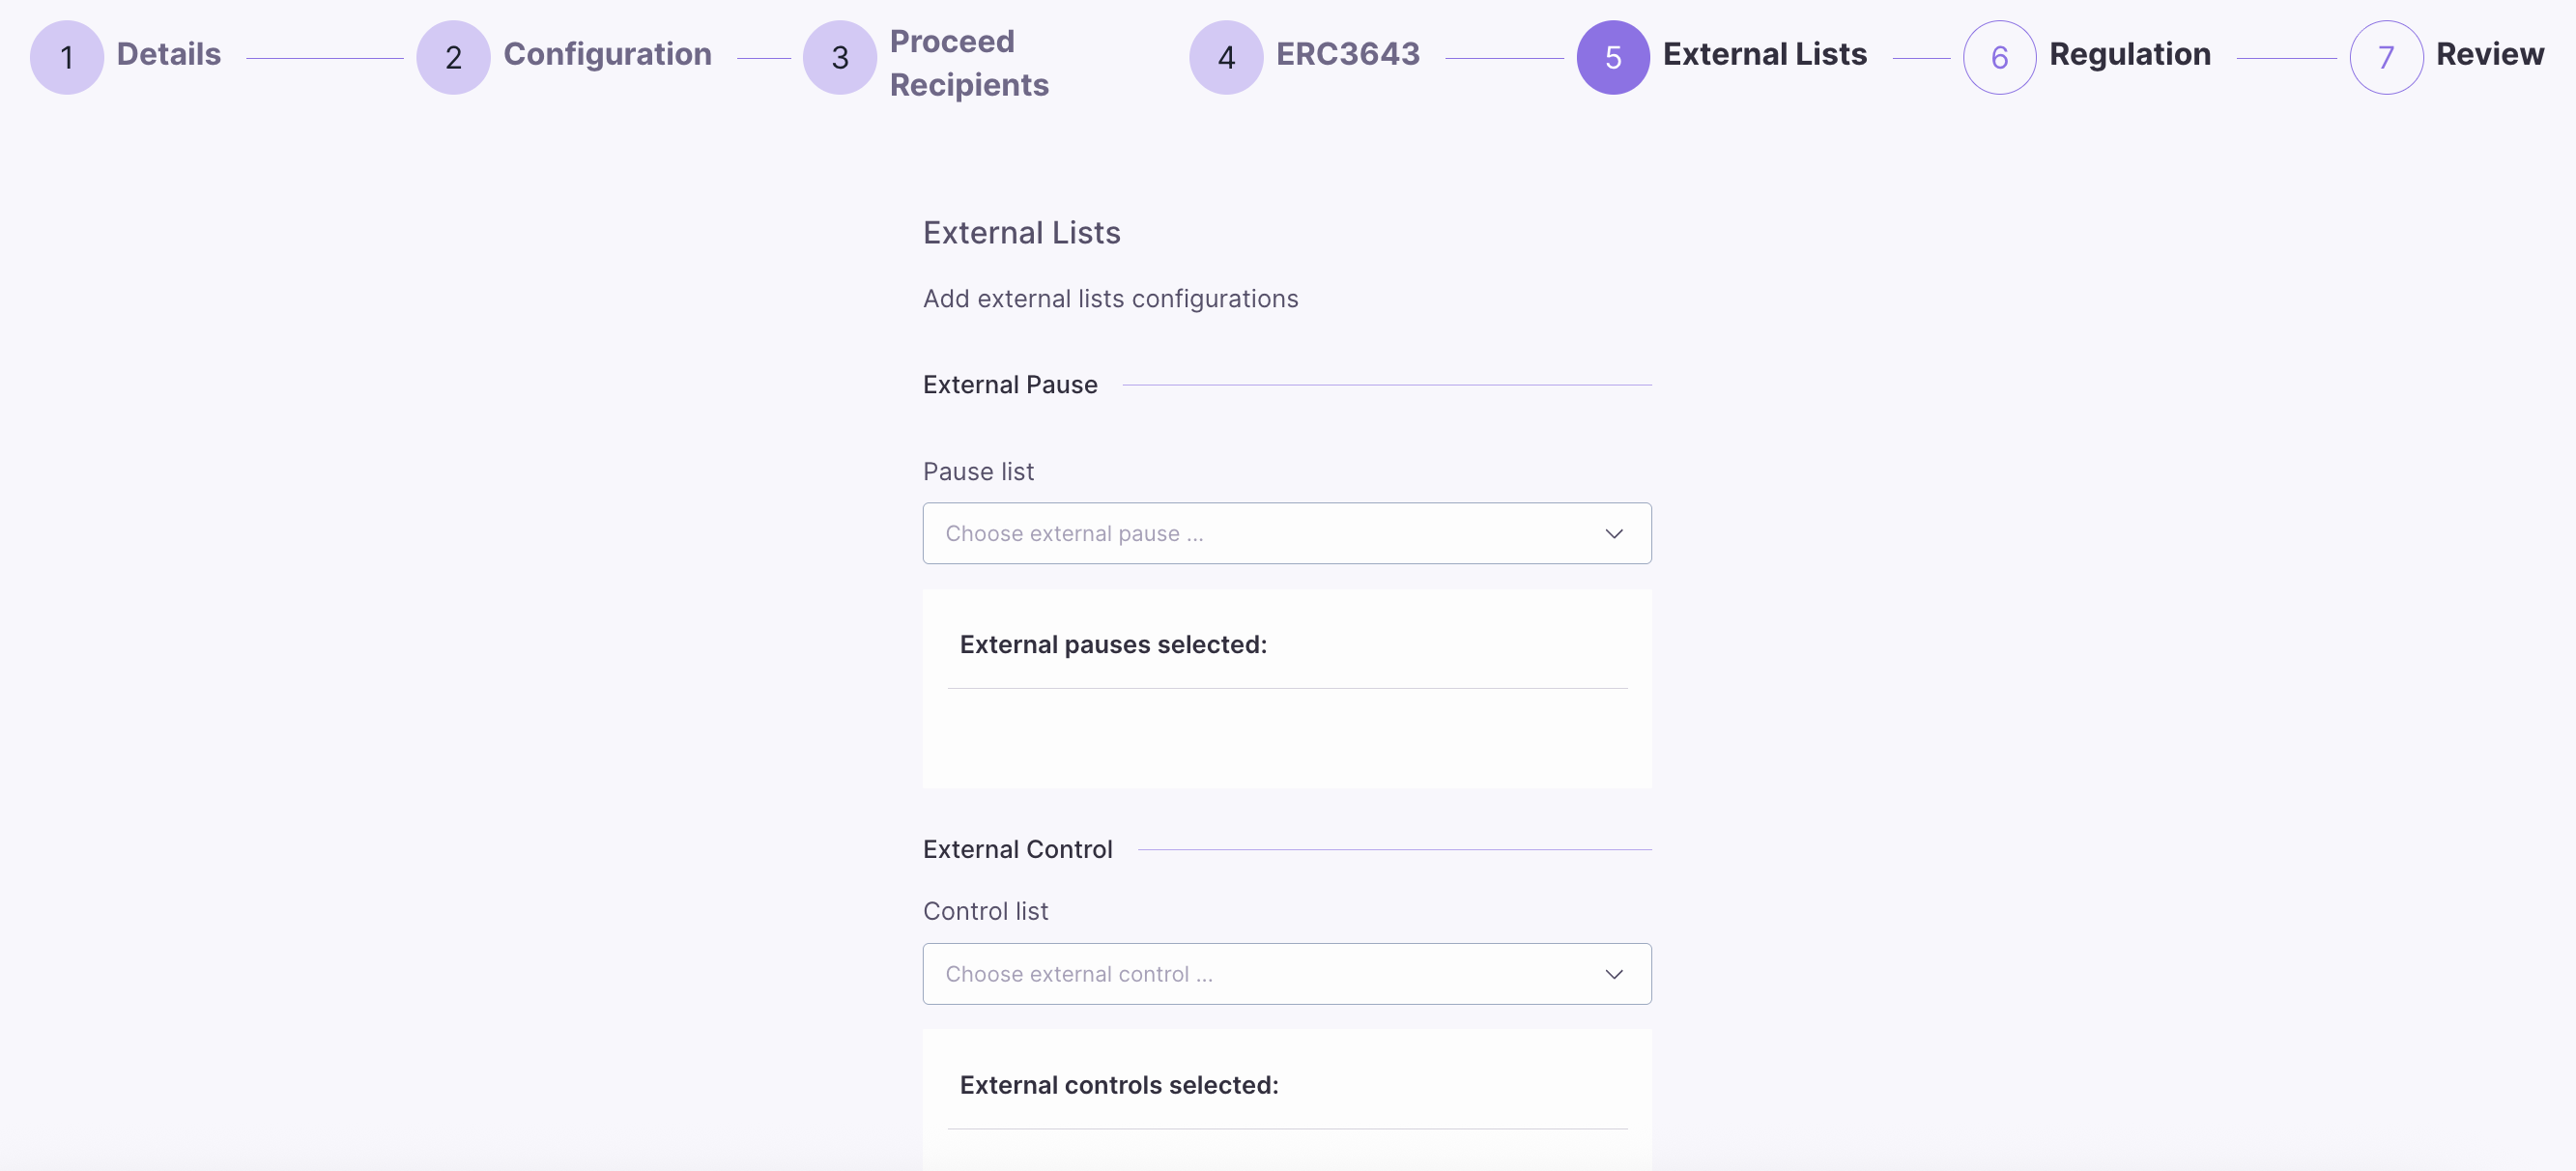
External Lists
Configure external management lists for enhanced control over your bond. These external lists provide additional layers of security and compliance by integrating with external smart contracts.- External Pause List: Select from available external pause contracts that can trigger emergency pauses of token operations. Multiple pause contracts can be selected to provide redundant safety mechanisms.
- External Control List: Choose external control contracts that provide additional governance and control capabilities over the equity token. This allows for sophisticated multi-party control structures.
- External KYC List: Select external KYC (Know Your Customer) verification contracts that validate investor identities and compliance status. This enables integration with third-party KYC providers.
Regulation
Select the applicable regulation for your bond offering. The regulation determines the legal framework and compliance requirements that will govern the issuance and trading of your digital security.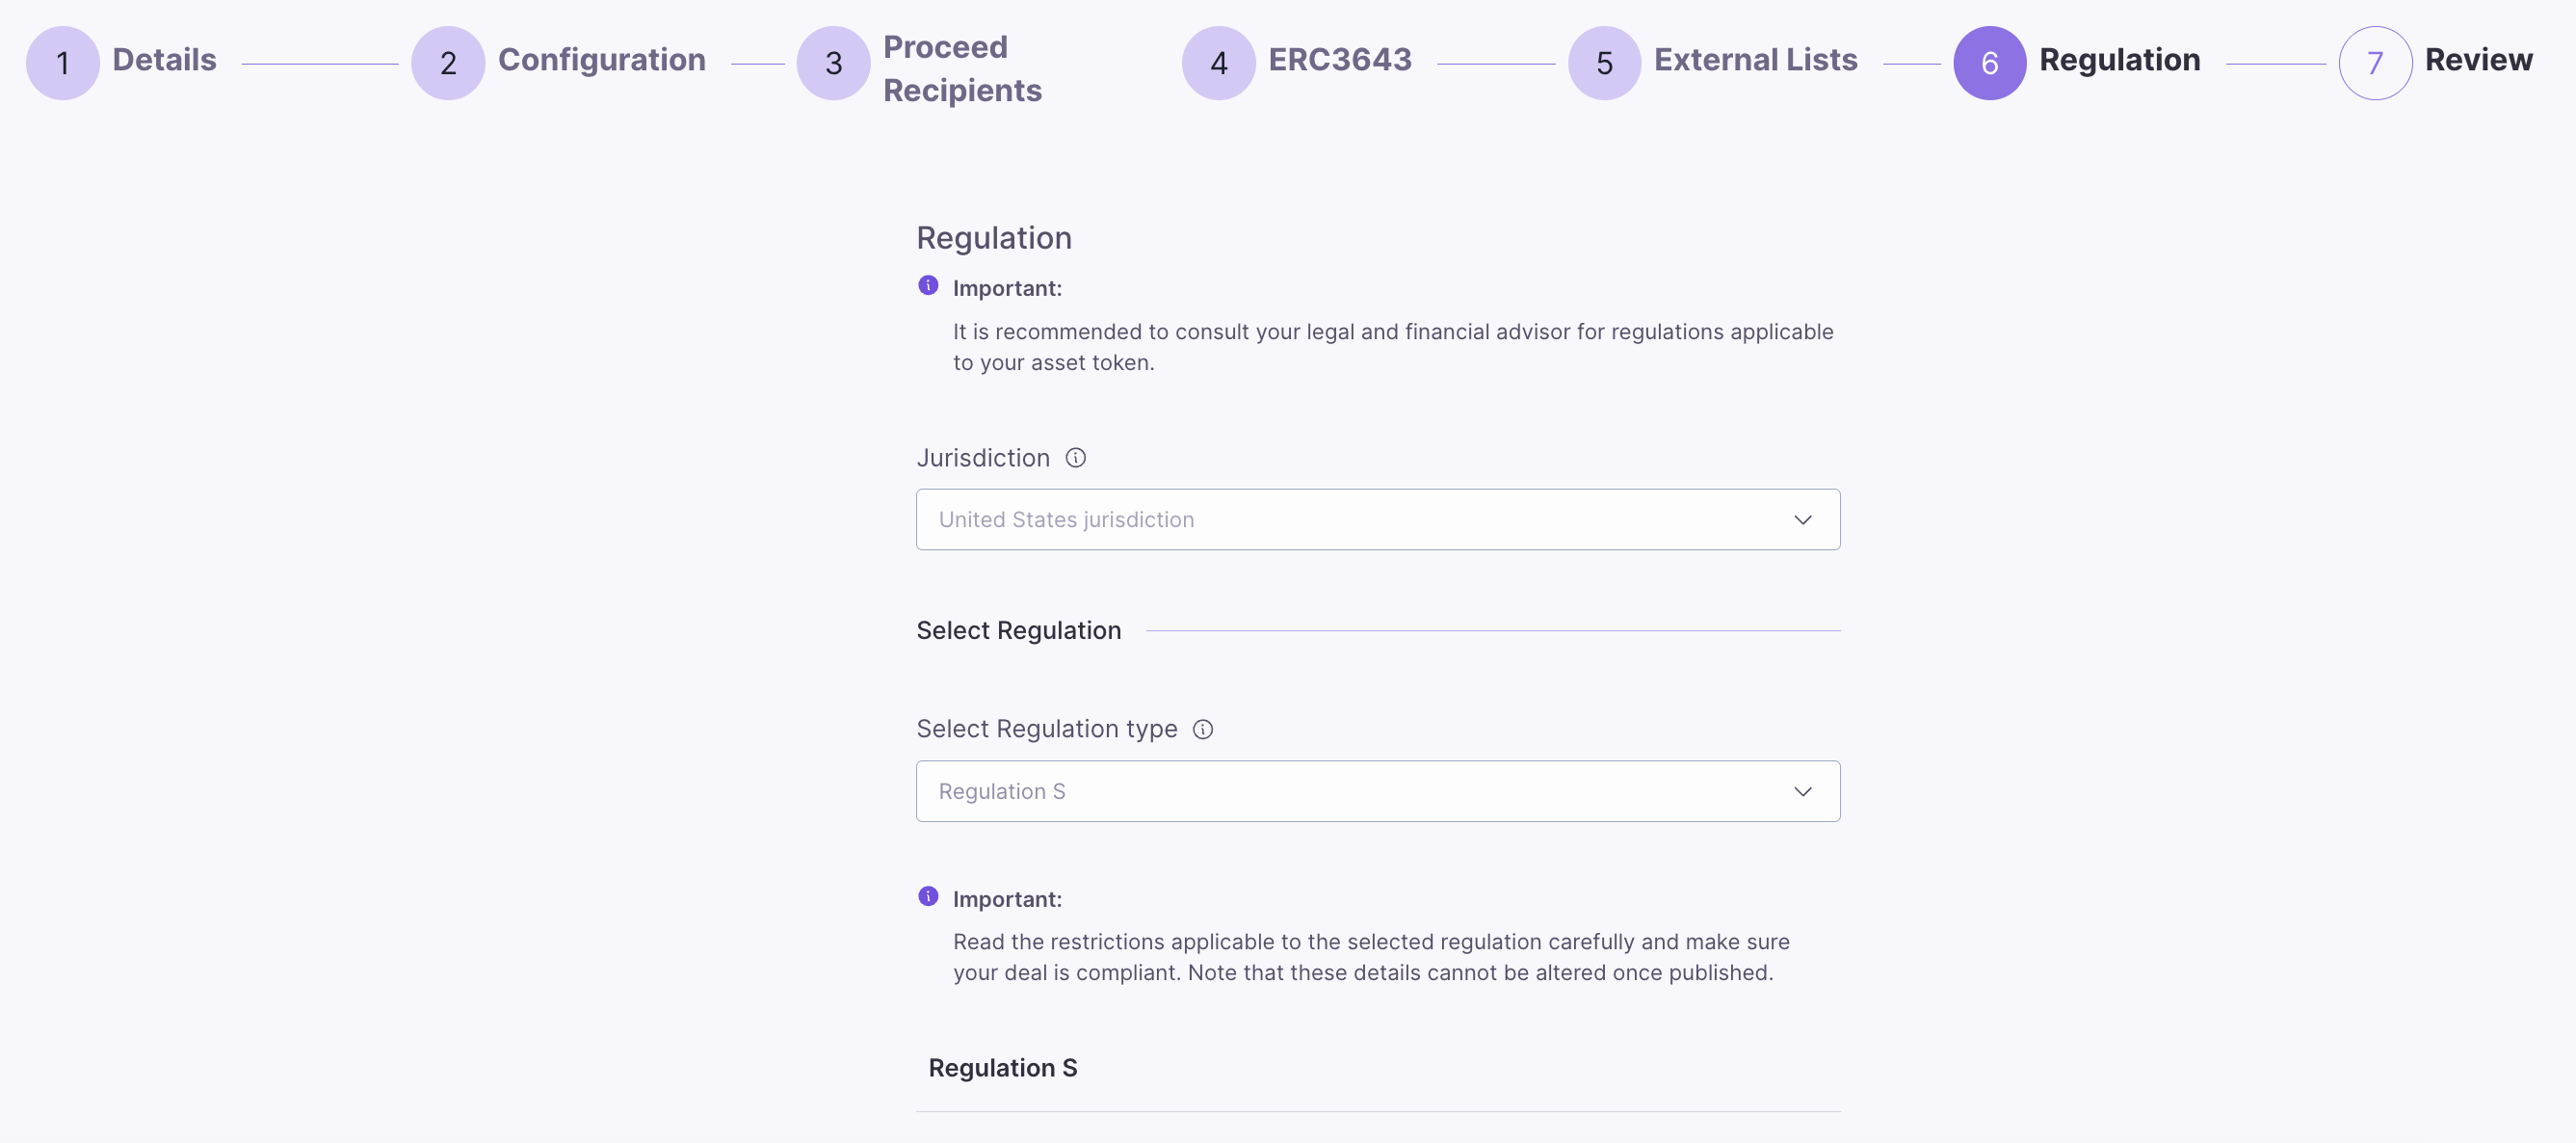
Blocklist
The blocklist prohibits specific investors from participating in a tokenized offering. Investors from the countries mentioned on this blocklist cannot invest in digital security. This functionality allows an issuer to adhere to particular legal, regulatory, or operational constraints applied to specific jurisdictions. For this, the issuer can select a country and then blocklist it to ensure that residents of that country do not create or participate in an offering.Review
Review the details of the new bond you are creating. Once you have confirmed that all the information is correct, click Create Bond and then Accept to finalize bond creation.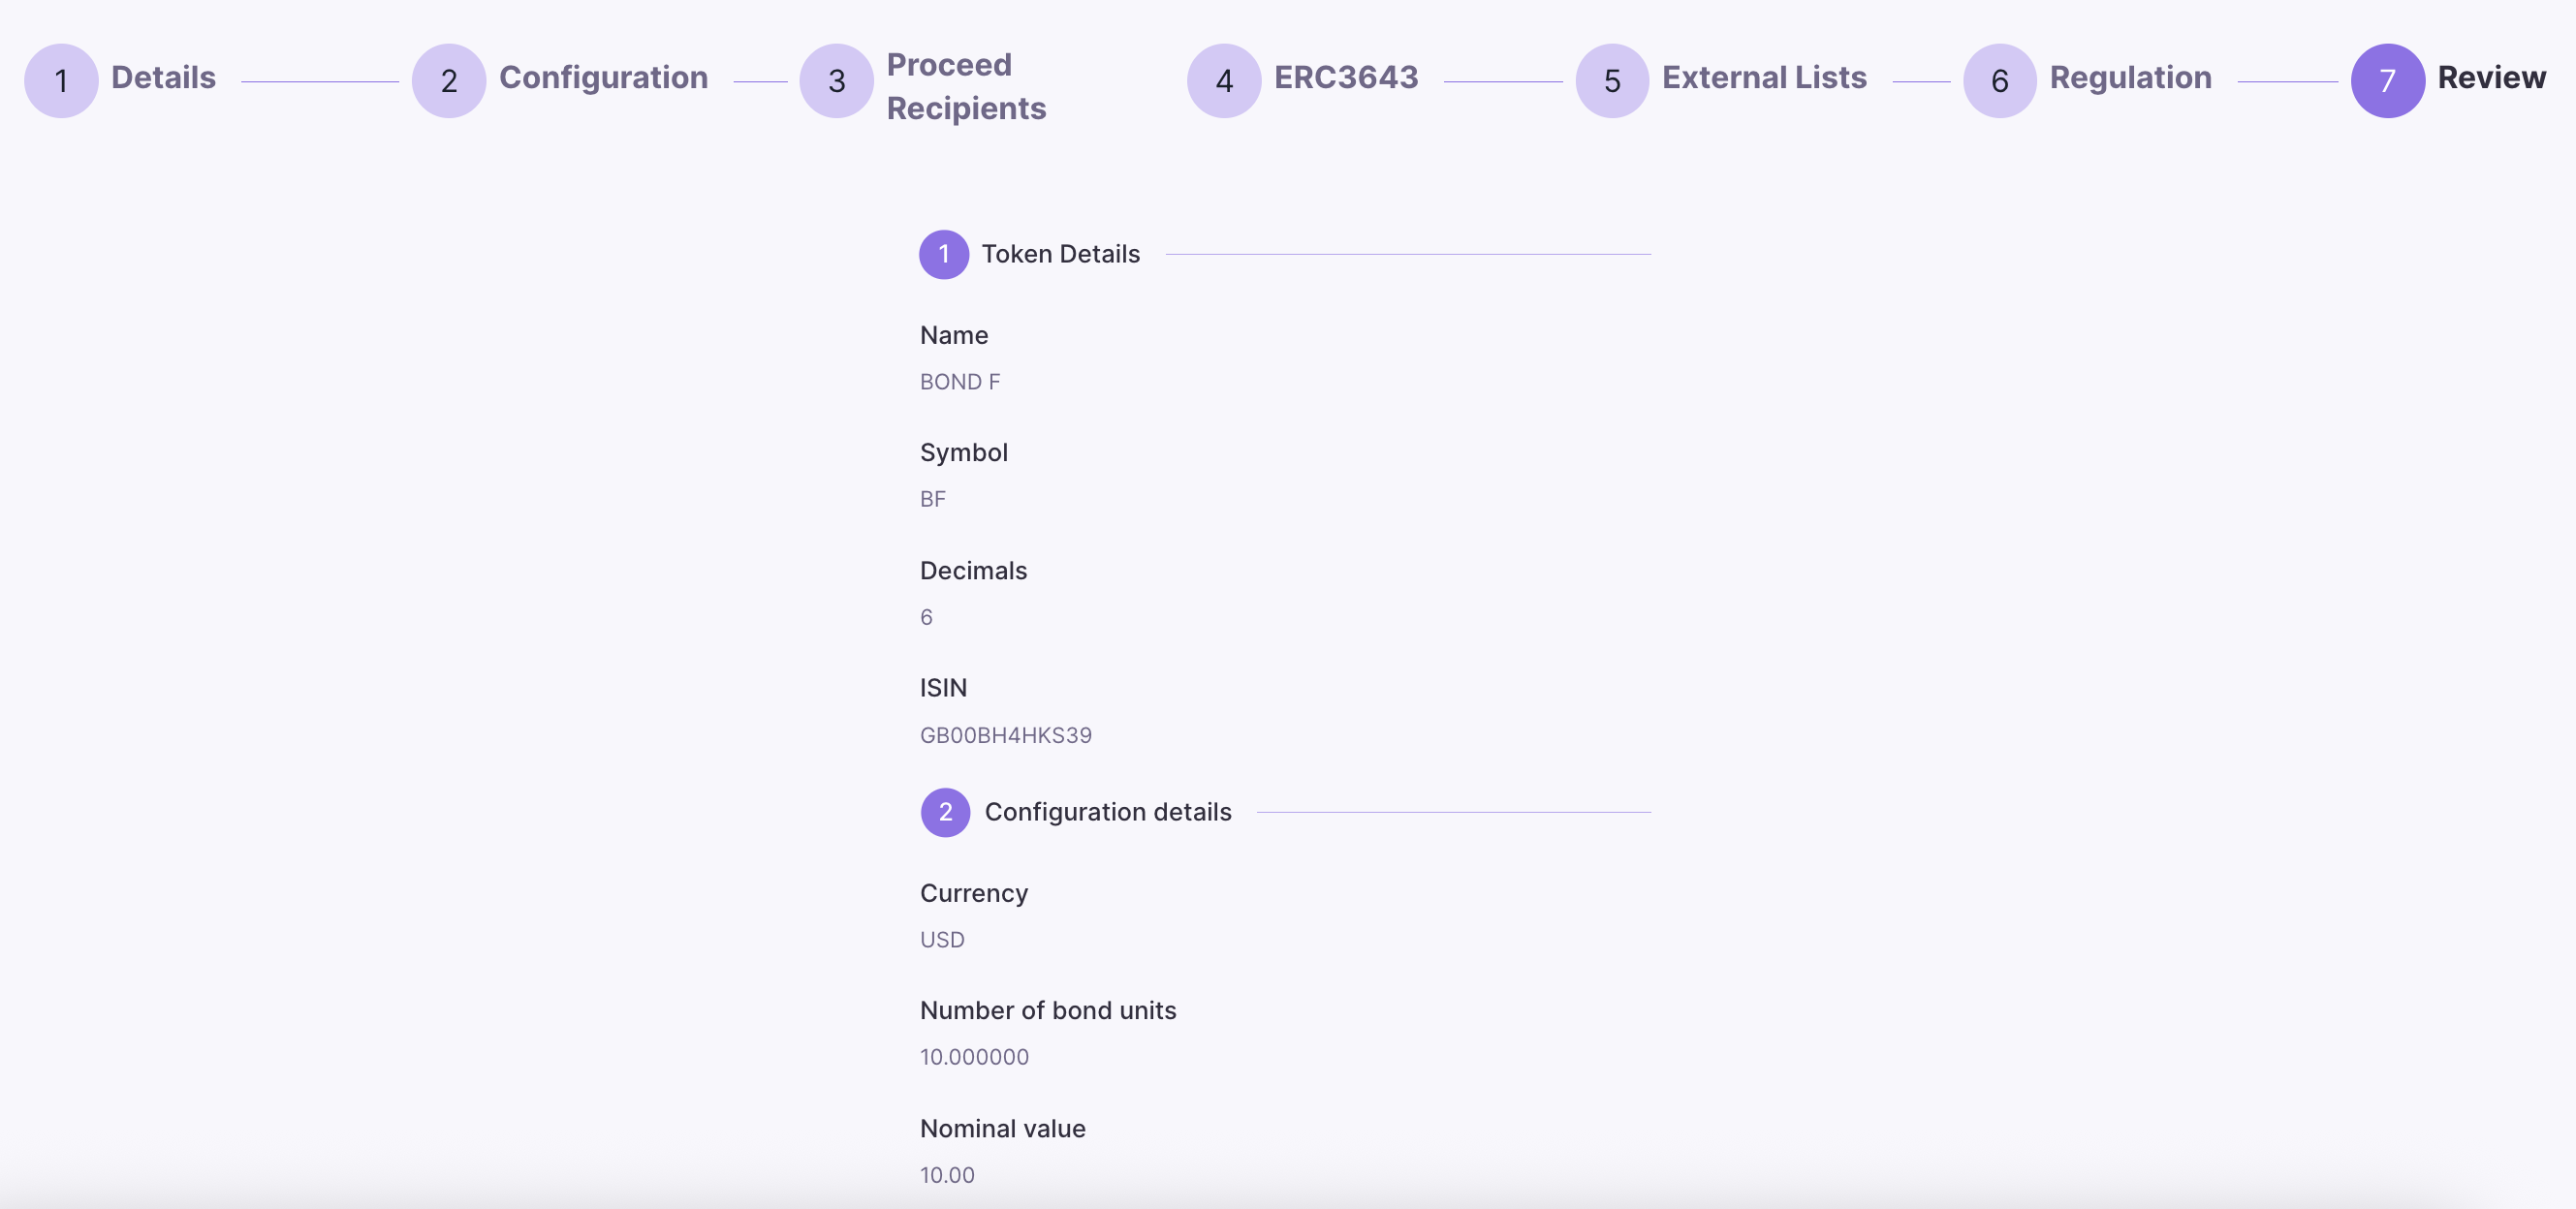
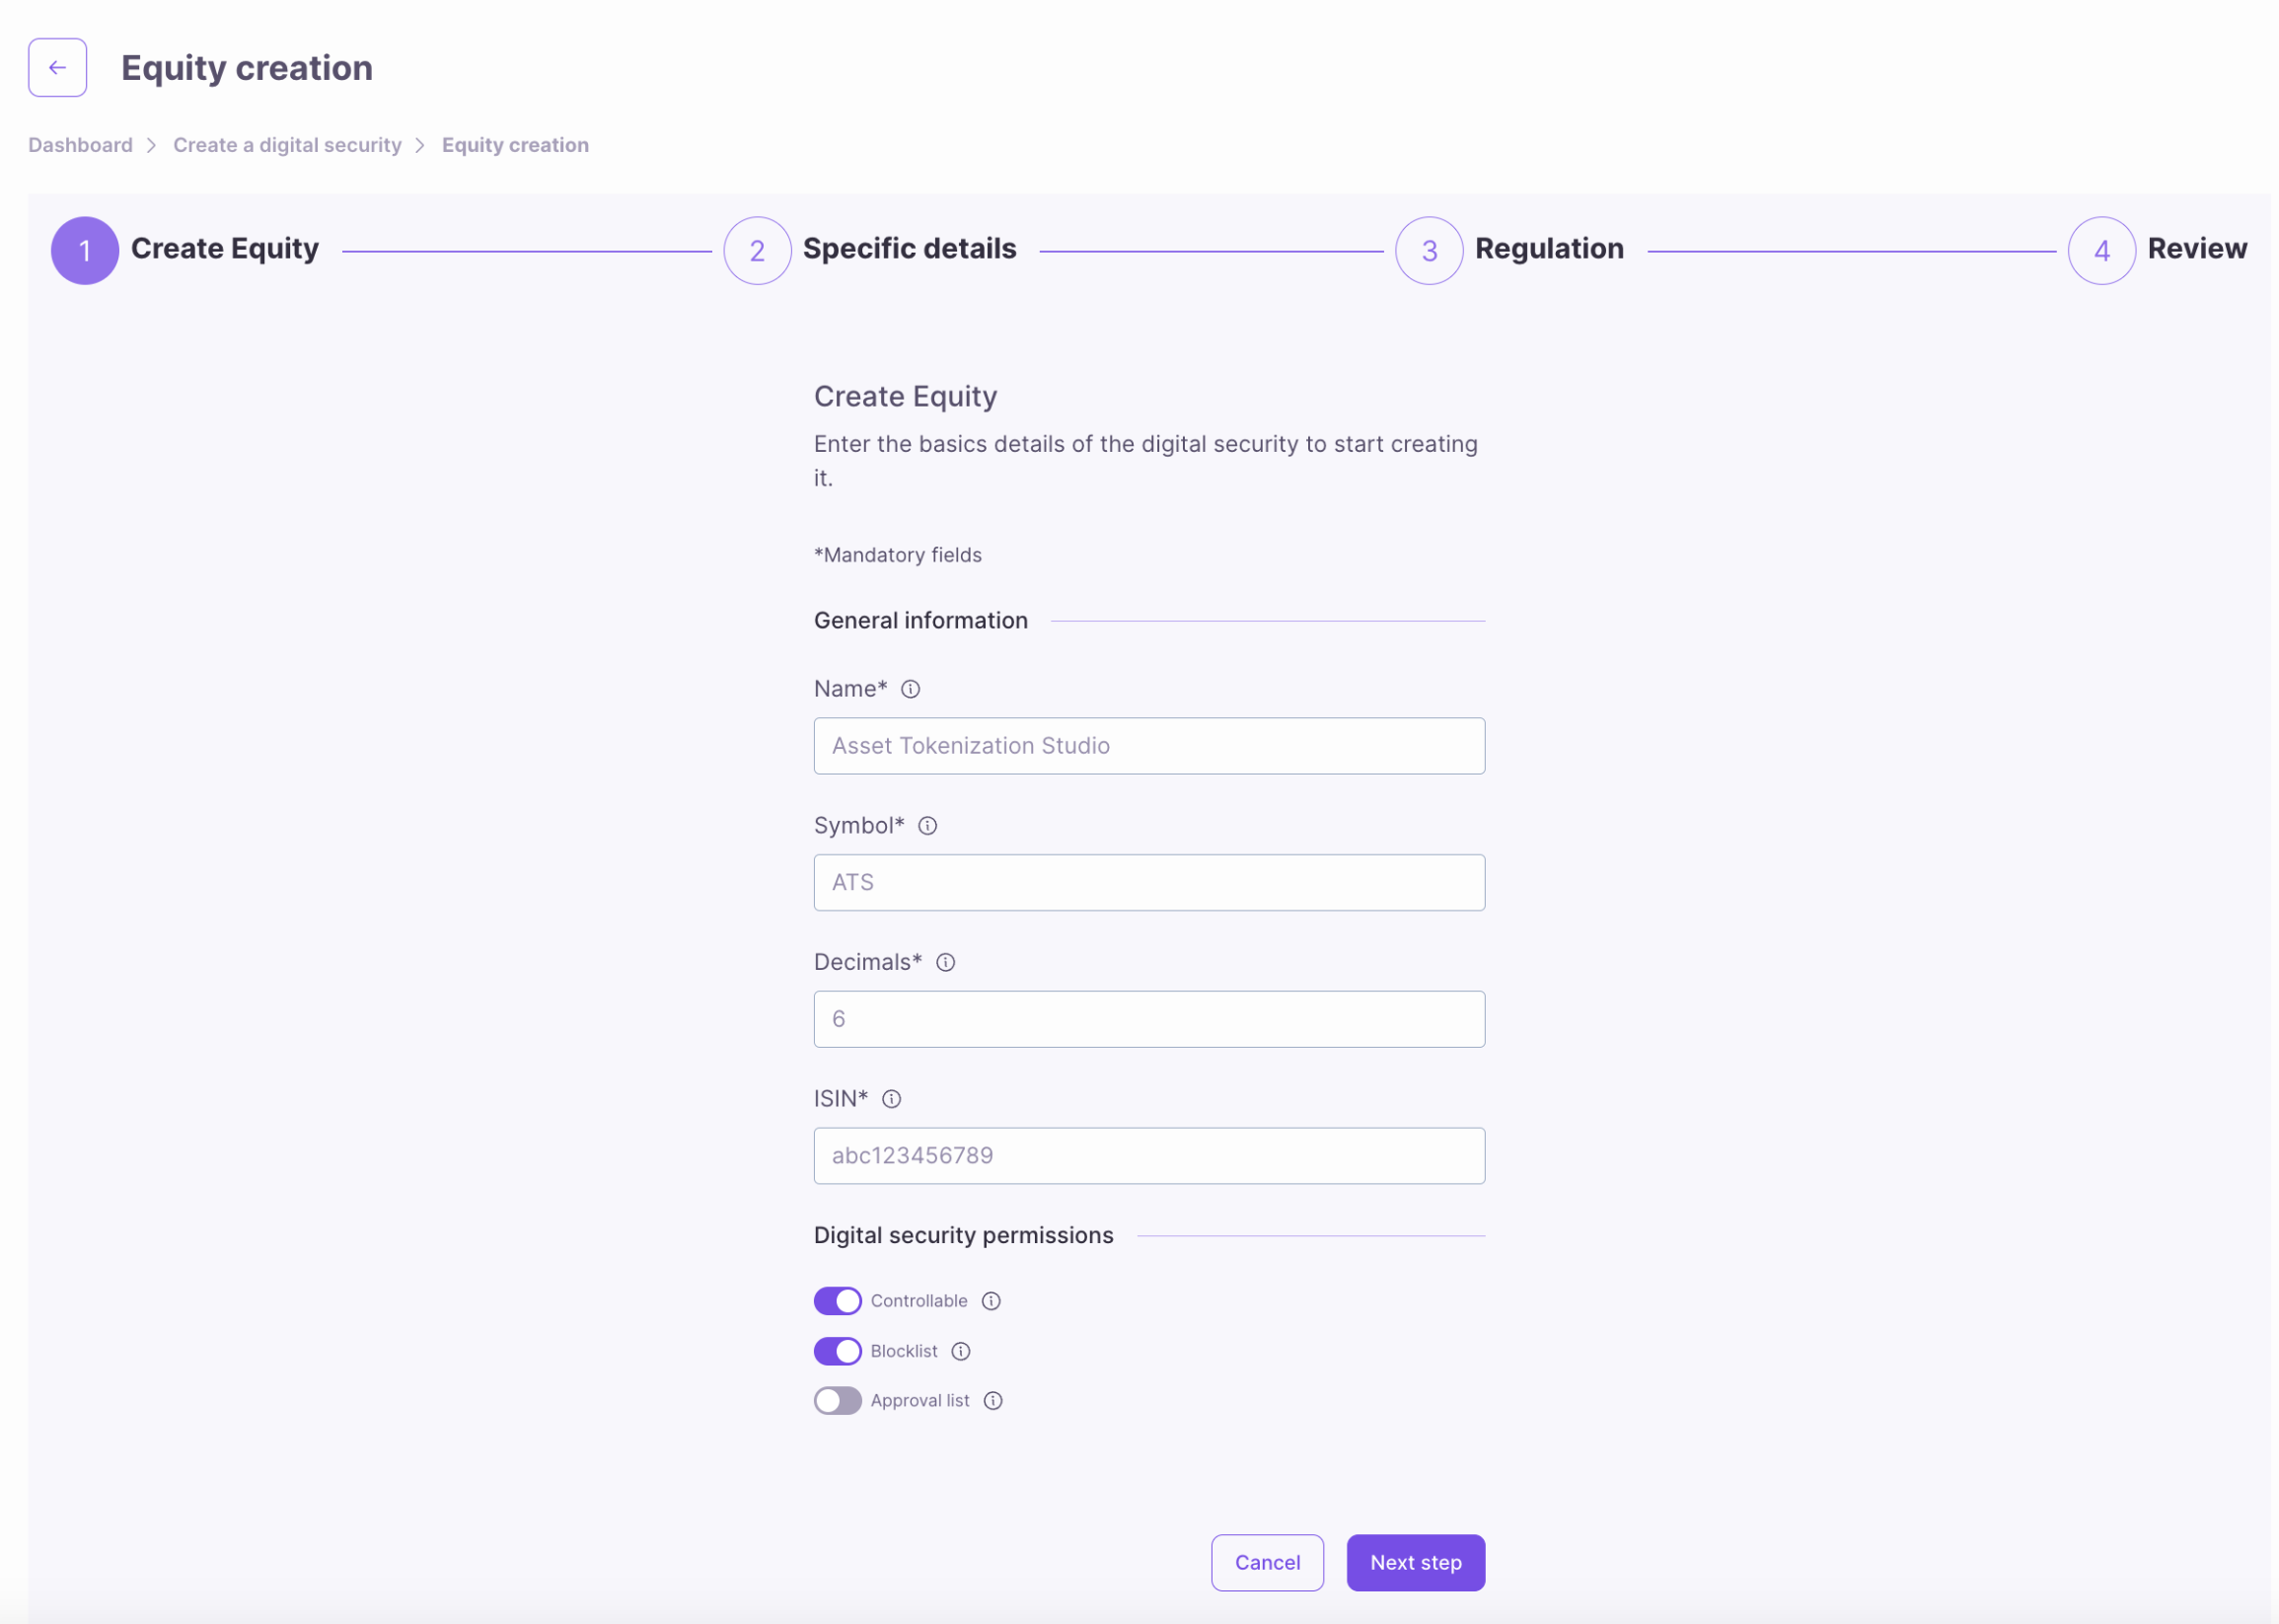
Create New Equity
Equity General Information
To initiate the creation of new equity, choose New Equity and enter the basic details of the new equity:- Name: Equity’s name.
- Symbol: Equity’s symbol.
- Decimals: Number of decimals units (default is 6).
- ISIN: International Security Identification Number - this can be any 12 alphanumeric characters (e.g., abc123456789, 111111111111, 1a2b3c4d5e6f).
Equity Permissions
Toggle the permissions you want to enable for your new equity:- Controllable: Enables token controller role and compliance operations.
- Blocklist: Enables access control to the security using a list of blocked accounts.
- Approval list: Enables access control to the security using a list of approved/allowed accounts.
Equity Details
Enter the specific details of the new equity, such as nominal value and number of shares, and select the applicable rights and privileges each token will hold.- Nominal Value: Value of each equity token in the selected currency.
- Currency: USD (default).
- Number of Shares: Equity’s maximum supply.
Learn more about Rights and Privileges ⬇
Learn more about Rights and Privileges ⬇
- Voting Rights: Tokens with voting rights grant their holders the right to participate in governance.
- Information Rights: The holders with these information rights may request transparency in the form of regular reports on how the company is performing.
- Liquidation Rights: The holders of liquidation rights will have a claim on the assets if the firm dissolves normally after debts are paid.
- Conversion Rights: These are the rights of equity holders to convert their equity tokens into another security; for example, preferred shares into common shares and equity into debt tokens.
- Subscription Rights: The right of current equity holders to buy additional equity shares at pre-determined prices, often in advance of offering shares to the general market. This prevents ownership from being diluted.
- Redemption Rights: The right of equity holders to force the company to buy back or redeem their shares, usually under specified conditions or at certain times.
- Put Rights: A right given to the equity holder to sell his shares back to the company at a predetermined price or under certain conditions.

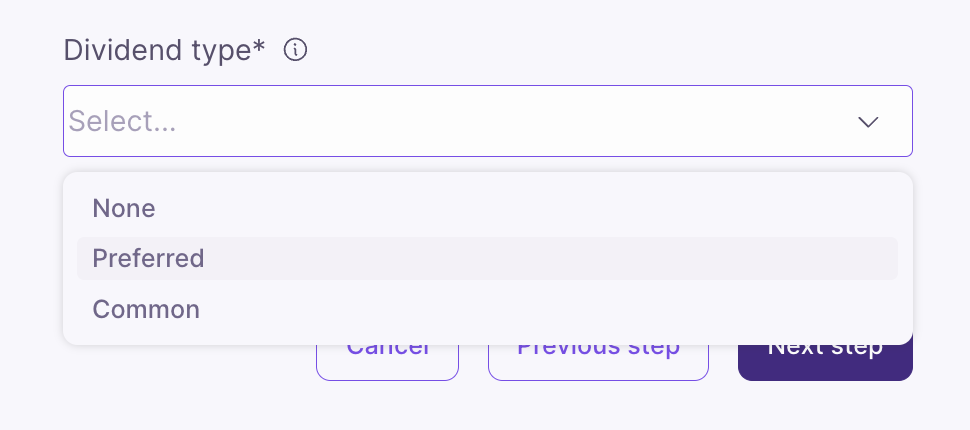
Dividends
Types of dividends available for equity holders, including none, preferred, and common dividends.- None: Equity holders won’t receive dividends.
- Preferred: Equity holders are entitled to preferential dividends that have to be paid before common dividends and may be at a fixed rate relative to nominal value.
- Common: Equity holders enjoy common dividends that may vary and, if any is paid, after preferred.
External Lists
Configure external management lists for enhanced control over your equity. These external lists provide additional layers of security and compliance by integrating with external smart contracts.- External Pause List: Select from available external pause contracts that can trigger emergency pauses of token operations. Multiple pause contracts can be selected to provide redundant safety mechanisms.
- External Control List: Choose external control contracts that provide additional governance and control capabilities over the equity token. This allows for sophisticated multi-party control structures.
- External KYC List: Select external KYC (Know Your Customer) verification contracts that validate investor identities and compliance status. This enables integration with third-party KYC providers.
ERC-3643
Configure ERC-3643 compliance settings for your equity. ERC-3643 is a standard for permissioned tokens that enables compliance with securities regulations through on-chain compliance rules and identity verification.- Compliance ID: The Hedera account ID of the compliance smart contract that will enforce the regulatory rules for this equity. This is optional and can be left empty if not using ERC-3643 compliance.
- Identity Registry ID: The Hedera account ID of the identity registry contract that manages investor identities and their compliance status. This is optional and can be left empty if not using ERC-3643 identity management.
Regulation
Select the applicable regulation for your equity offering. The regulation determines the legal framework and compliance requirements that will govern the issuance and trading of your digital security.Blocklist
The blocklist prohibits specific investors from participating in a tokenized offering. Investors from the countries mentioned on this blocklist cannot invest in digital security. This functionality allows an issuer to adhere to particular legal, regulatory, or operational constraints applied to specific jurisdictions. For this, the issuer can select a country and then blocklist it to ensure that residents of that country do not create or participate in an offering.Review
Review the details of the new equity you are creating. Once you have confirmed that all the information is correct, click Create Equity and then Accept to finalize equity creation. Please note that you will not be able to edit the details after the equity is created, so take your time to review them carefully.Manage Roles
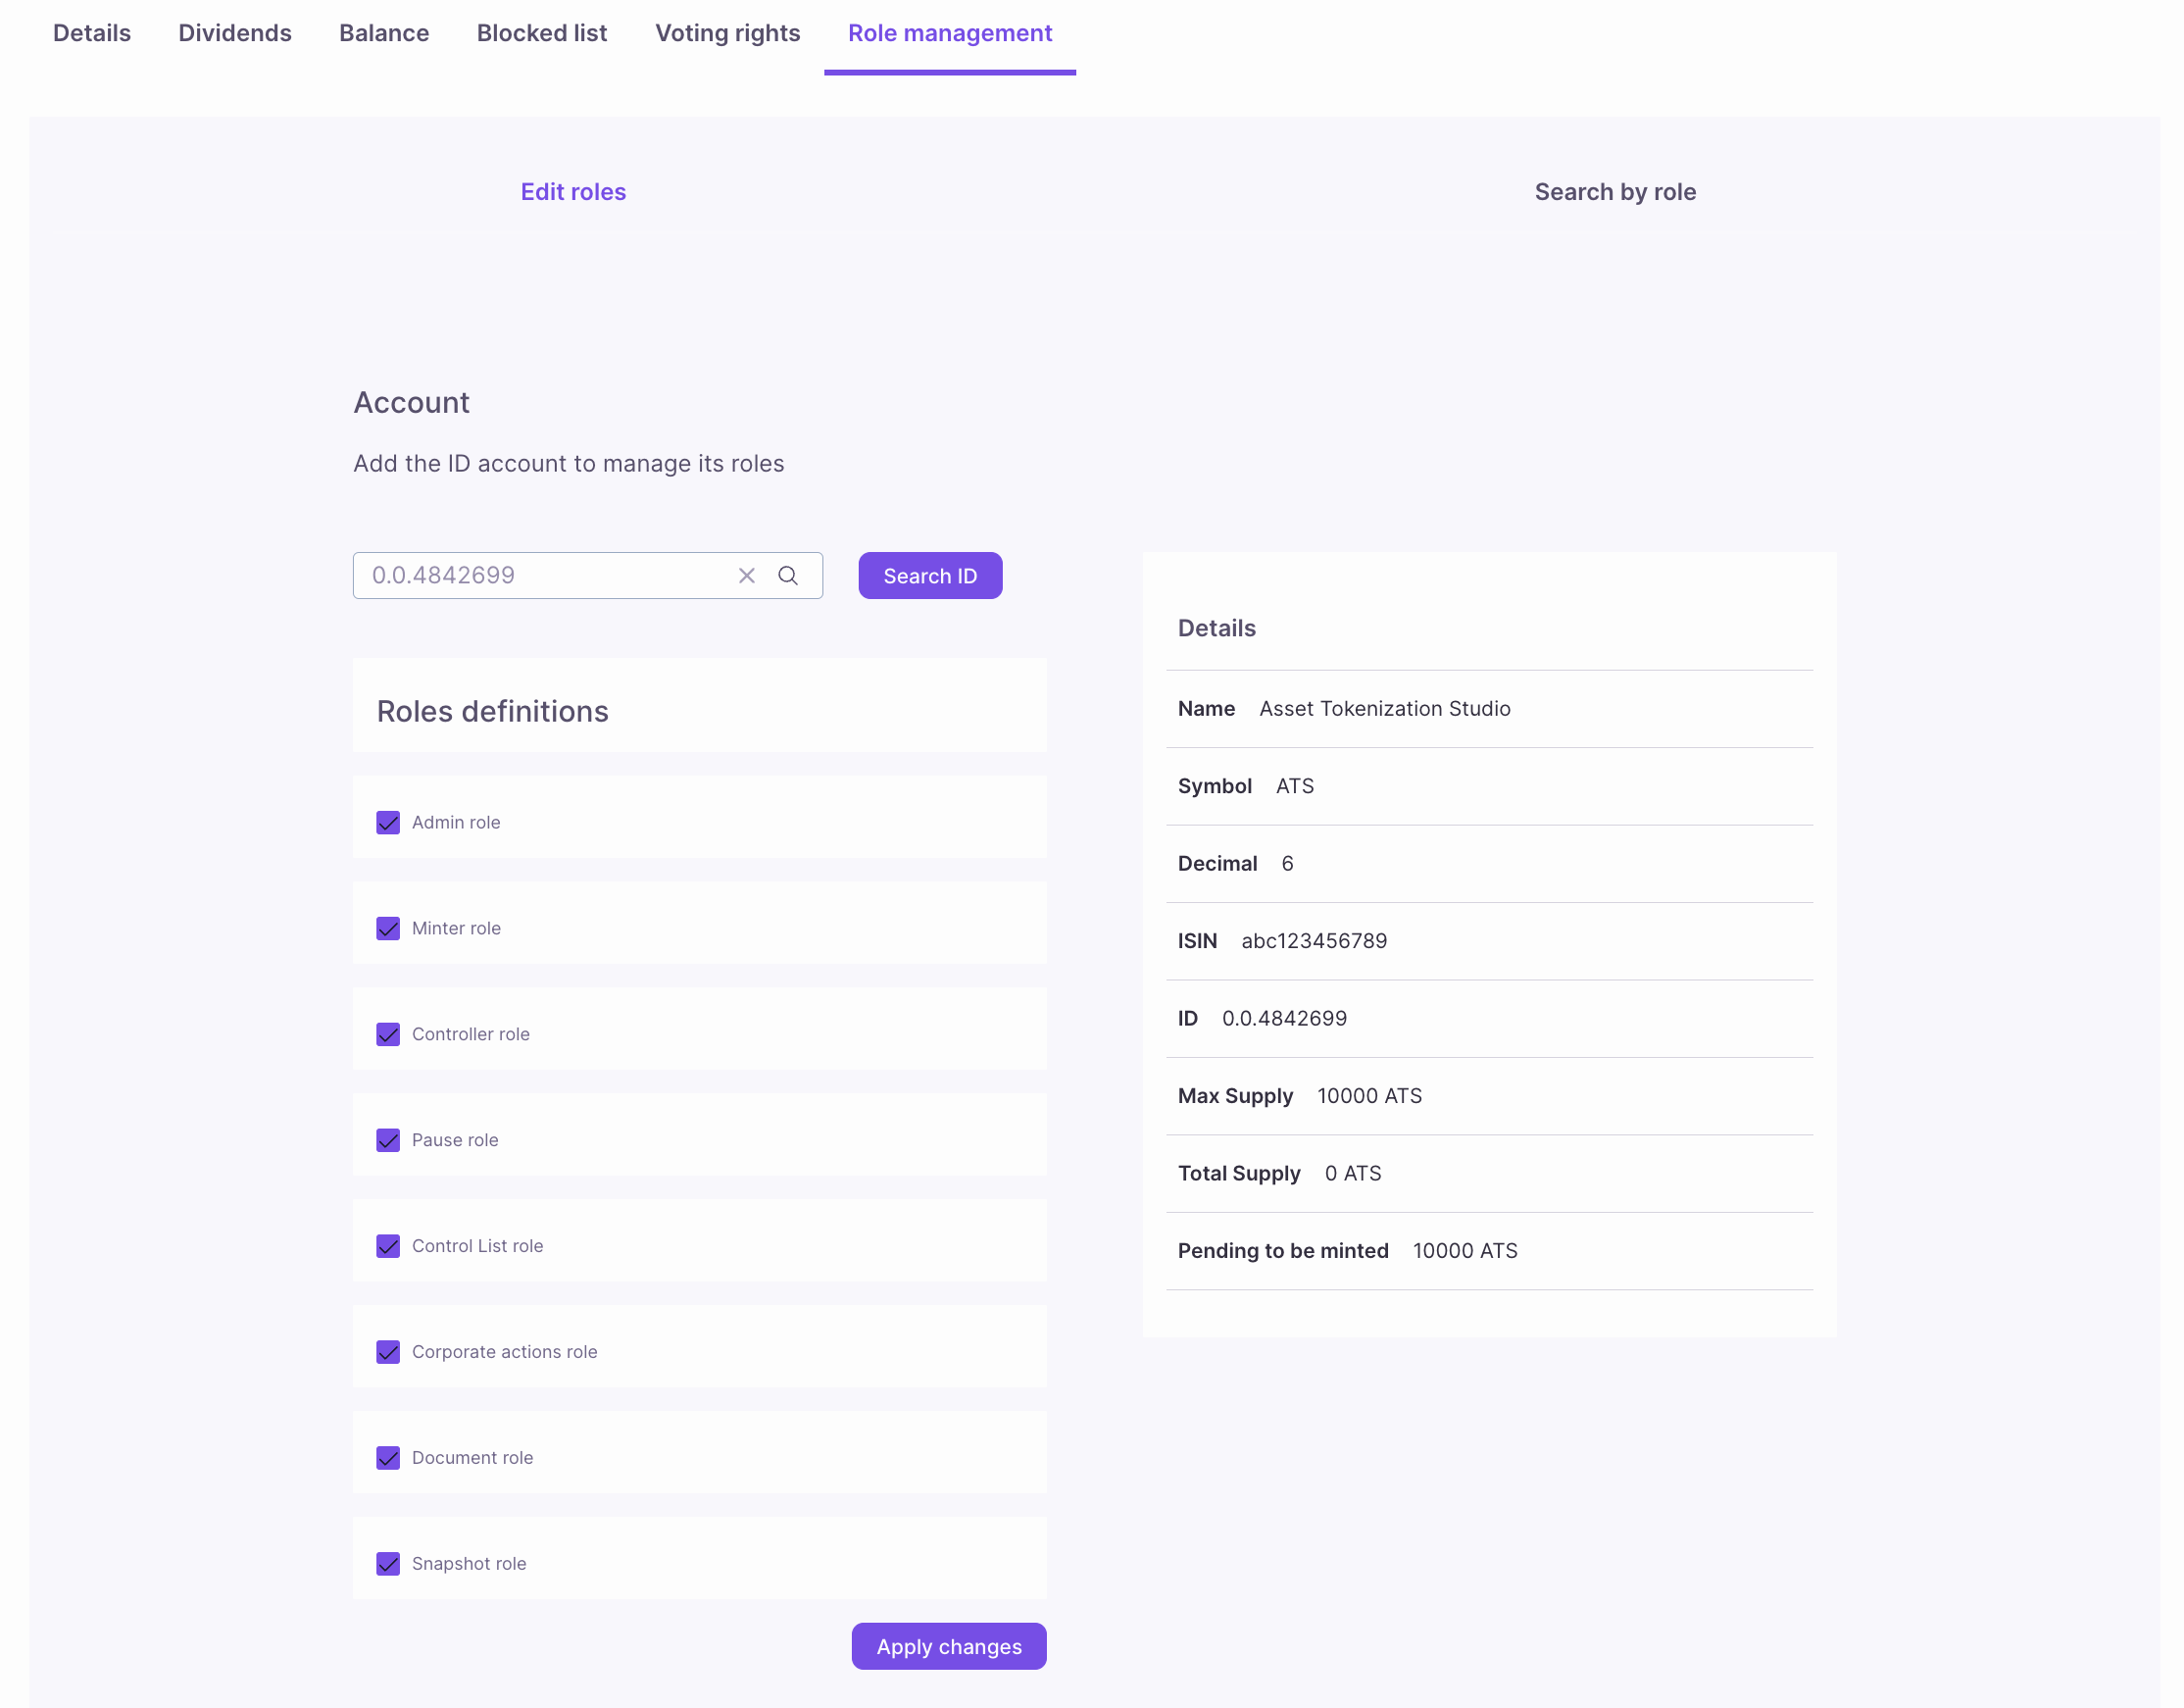
In Asset Tokenization Studio (ATS), role management is a crucial feature that provides control over various functions related to the management and operation of digital securities. If your account is assigned the Admin Role, you can manage other roles for your security tokens, making governance easier and more secure. Roles you can manage include:- Admin: Grants full administrative privileges, including the ability to assign and manage all other roles.
- Minter: Permits the account to mint new tokens, increasing the supply of the asset.
- Controller: Authorizes the account to execute specific control actions over the tokenized asset, such as regulatory or operational updates.
- Pause: Allows the account to temporarily halt all transactions for the asset, useful in emergencies or during maintenance.
- Control List: Manages approval lists and blacklists, determining which accounts can or cannot participate in asset transactions.
- Corporate Actions: Enables the execution of corporate actions like dividend distributions or token conversions.
- Document: Grants the ability to manage and update asset-related documents, such as legal or compliance files.
- Snapshot: Authorizes the creation of snapshots, capturing the state of token holder balances at a specific point in time for reporting or auditing purposes.
Manage Securities
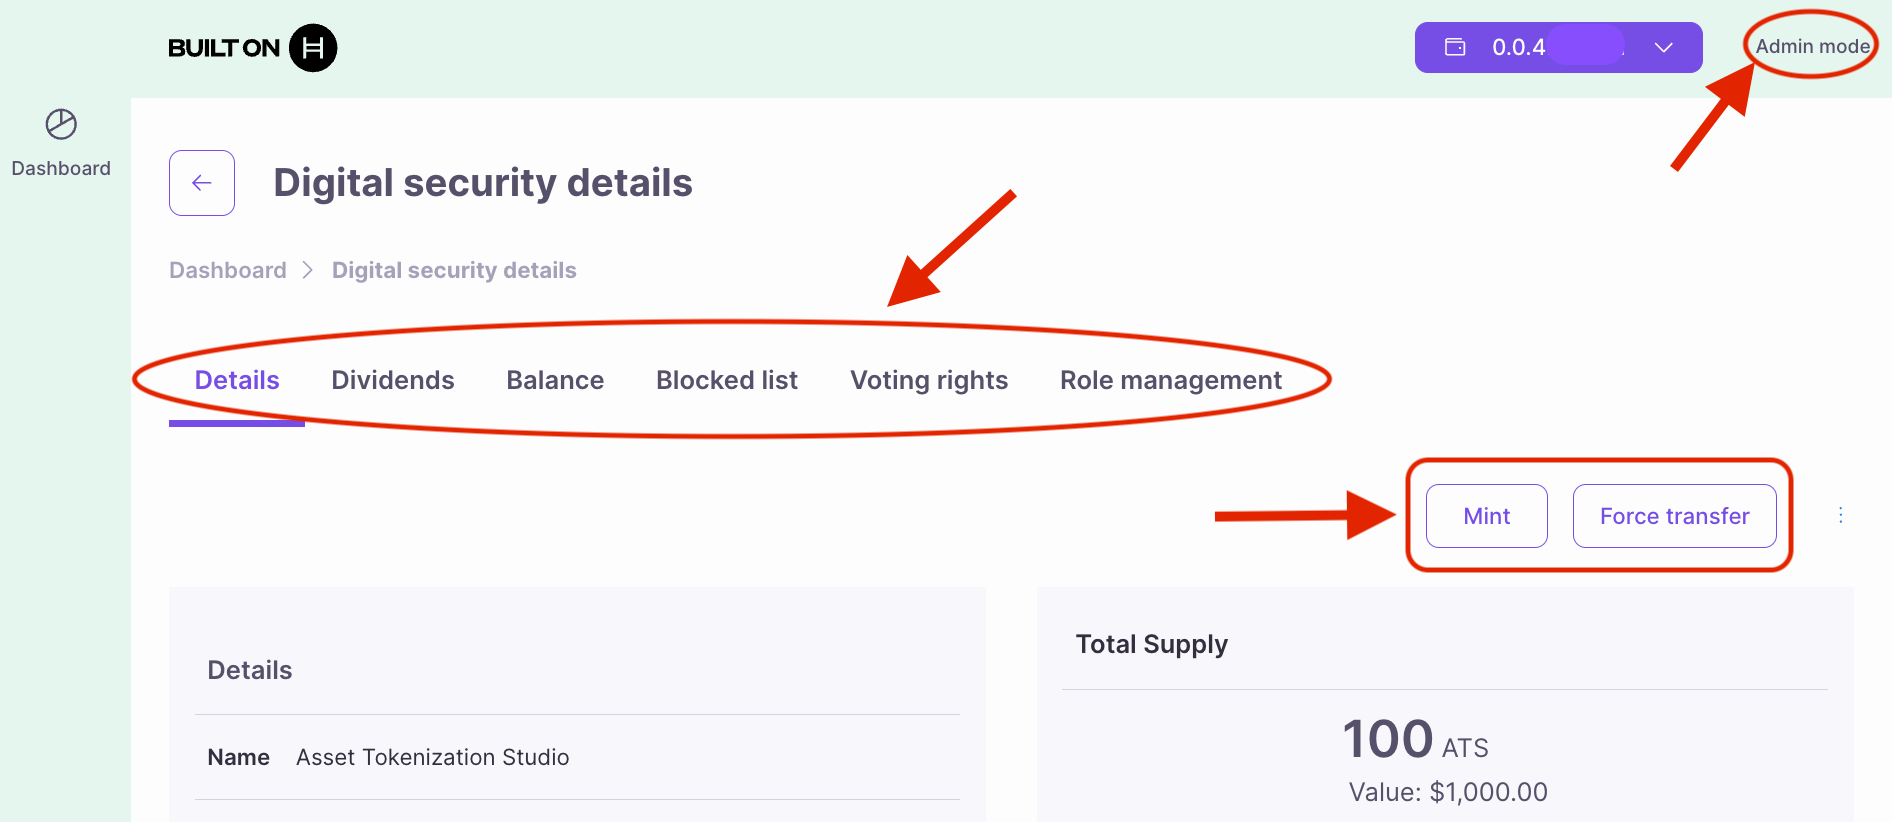
After assigning roles, ATS will display all operations available for each digital security based on the roles your account has been assigned. Simply click on the corresponding tab and follow the on-screen prompts to complete each operation. Here’s a rundown of the available operations by dashboard mode:Admin (mode) Dashboard
- Mint: Allows the creation of new tokens for the security, increasing the total supply based on the issuer’s parameters.
- Force Transfer: Enables the transfer of tokens from one account to another without the token holder’s consent, often used in cases of legal or regulatory necessity.
- Dividends: Programs dividend payments for equity tokens, specifying how and when dividends will be distributed to token holders. It also provides an overview of all programmed dividend payouts, including past, pending, or upcoming payments, allowing the issuer or investor to track distributions.
- Balances: Shows the balance of tokens held by various investors, offering a snapshot of current token holdings for the selected security.
- Blocked List: Manages a list of blocked or restricted investors who are prohibited from participating in token transactions, ensuring compliance with KYC/AML requirements.
- Voting Rights: Assigns, adjusts, or displays voting rights for security token holders, allowing them to participate in governance decisions, such as corporate actions or board elections.
- Role Management: Enables the assignment and management of roles (e.g., Admin, Minter, Controller) for specific users, determining their permissions and access to various operations within the digital security.
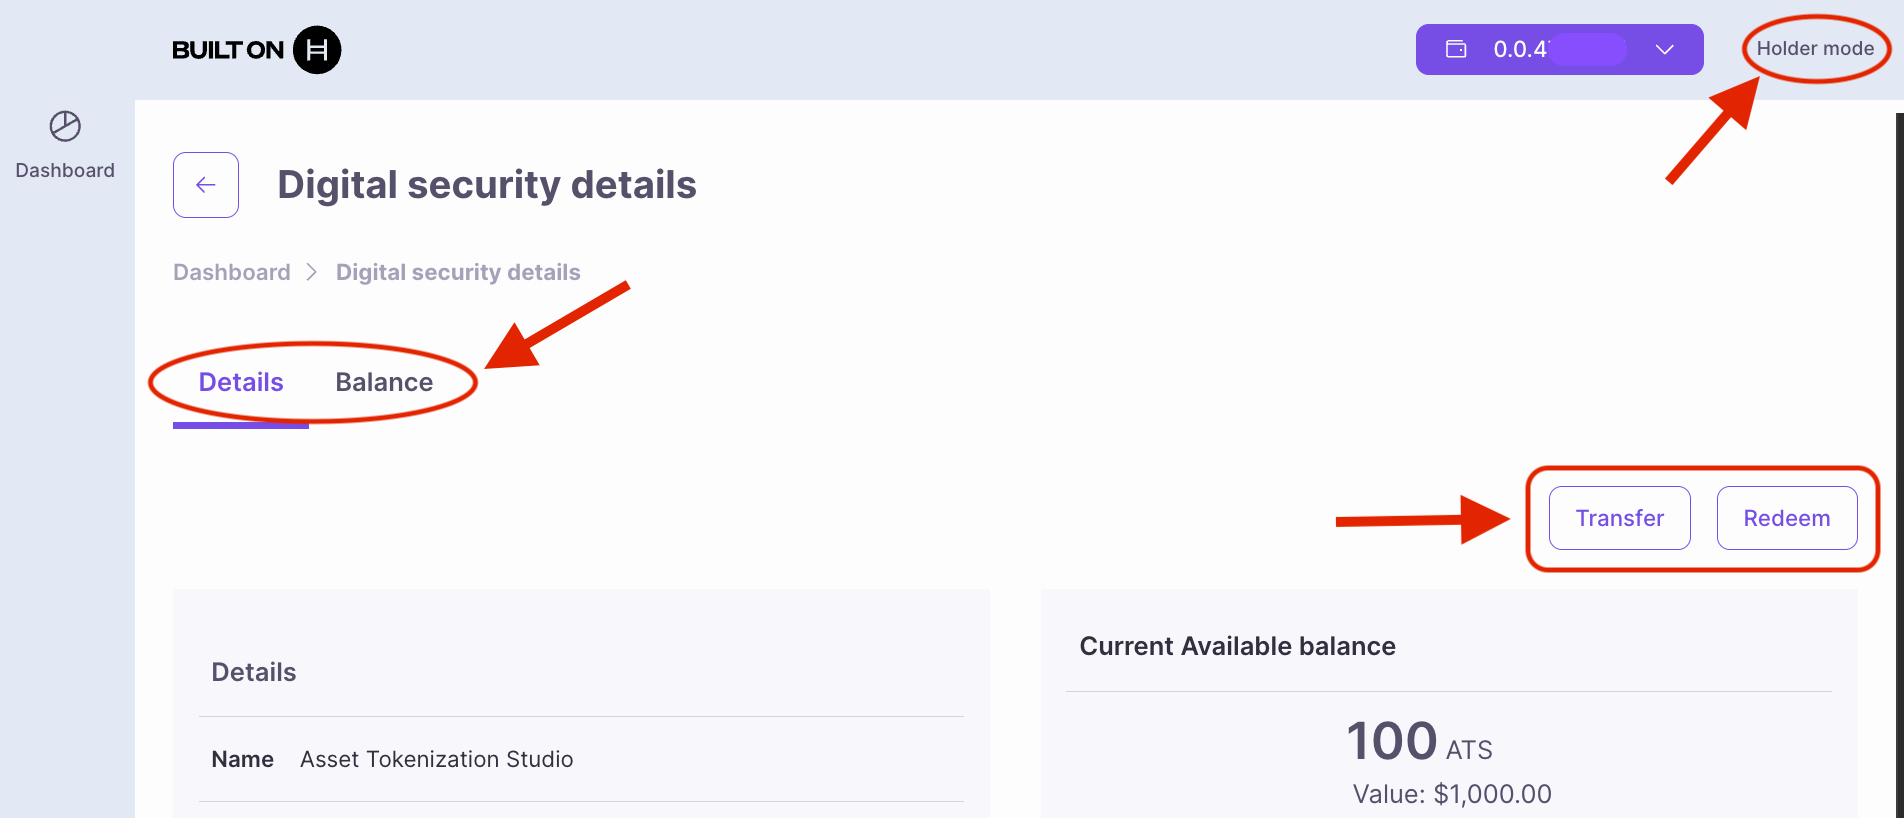
Holder (mode) Dashboard
- Transfer: Allows token holders to send their security tokens to another account or wallet, following any compliance rules.
- Redeem: Enables token holders to return their tokens to the issuer in exchange for cash, removing them from circulation.
- Balance: Displays the token holder’s current balance, providing a real-time view of the total tokens held for the selected asset.
KYC Management
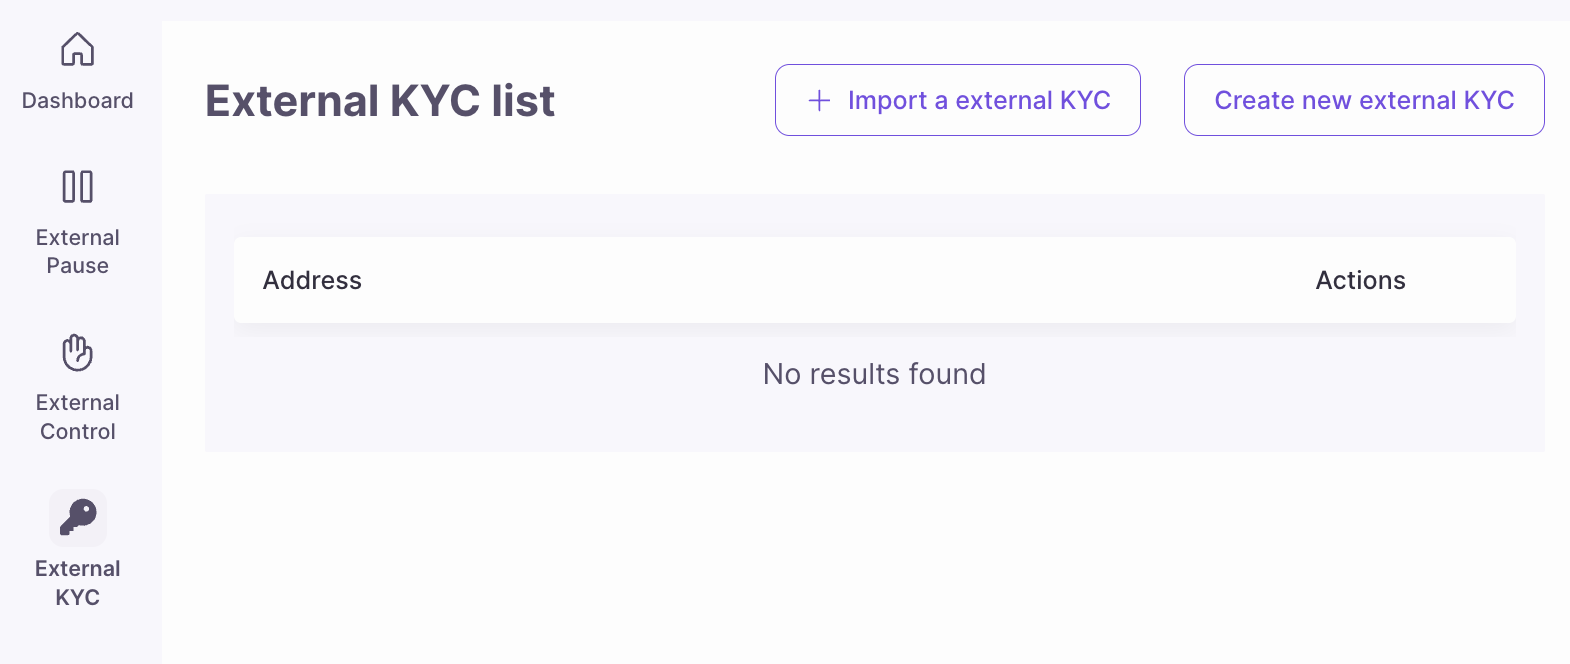
You have two ways to manage KYC. Choose based on your needs.External KYC List
Step 1: Create External KYC Contract
- Navigate to External KYC in the main menu
- Click Create New External KYC
- Add Account ID (of yourself or other account)
- Note the contract ID (
0.0.xxx)
Step 2: Grant KYC to Accounts
- In the External KYC page, select your contract
- Click Add Account
- Enter Account ID of external KYC contract:
0.0.xxx - Click Grant KYC
- Sign transaction

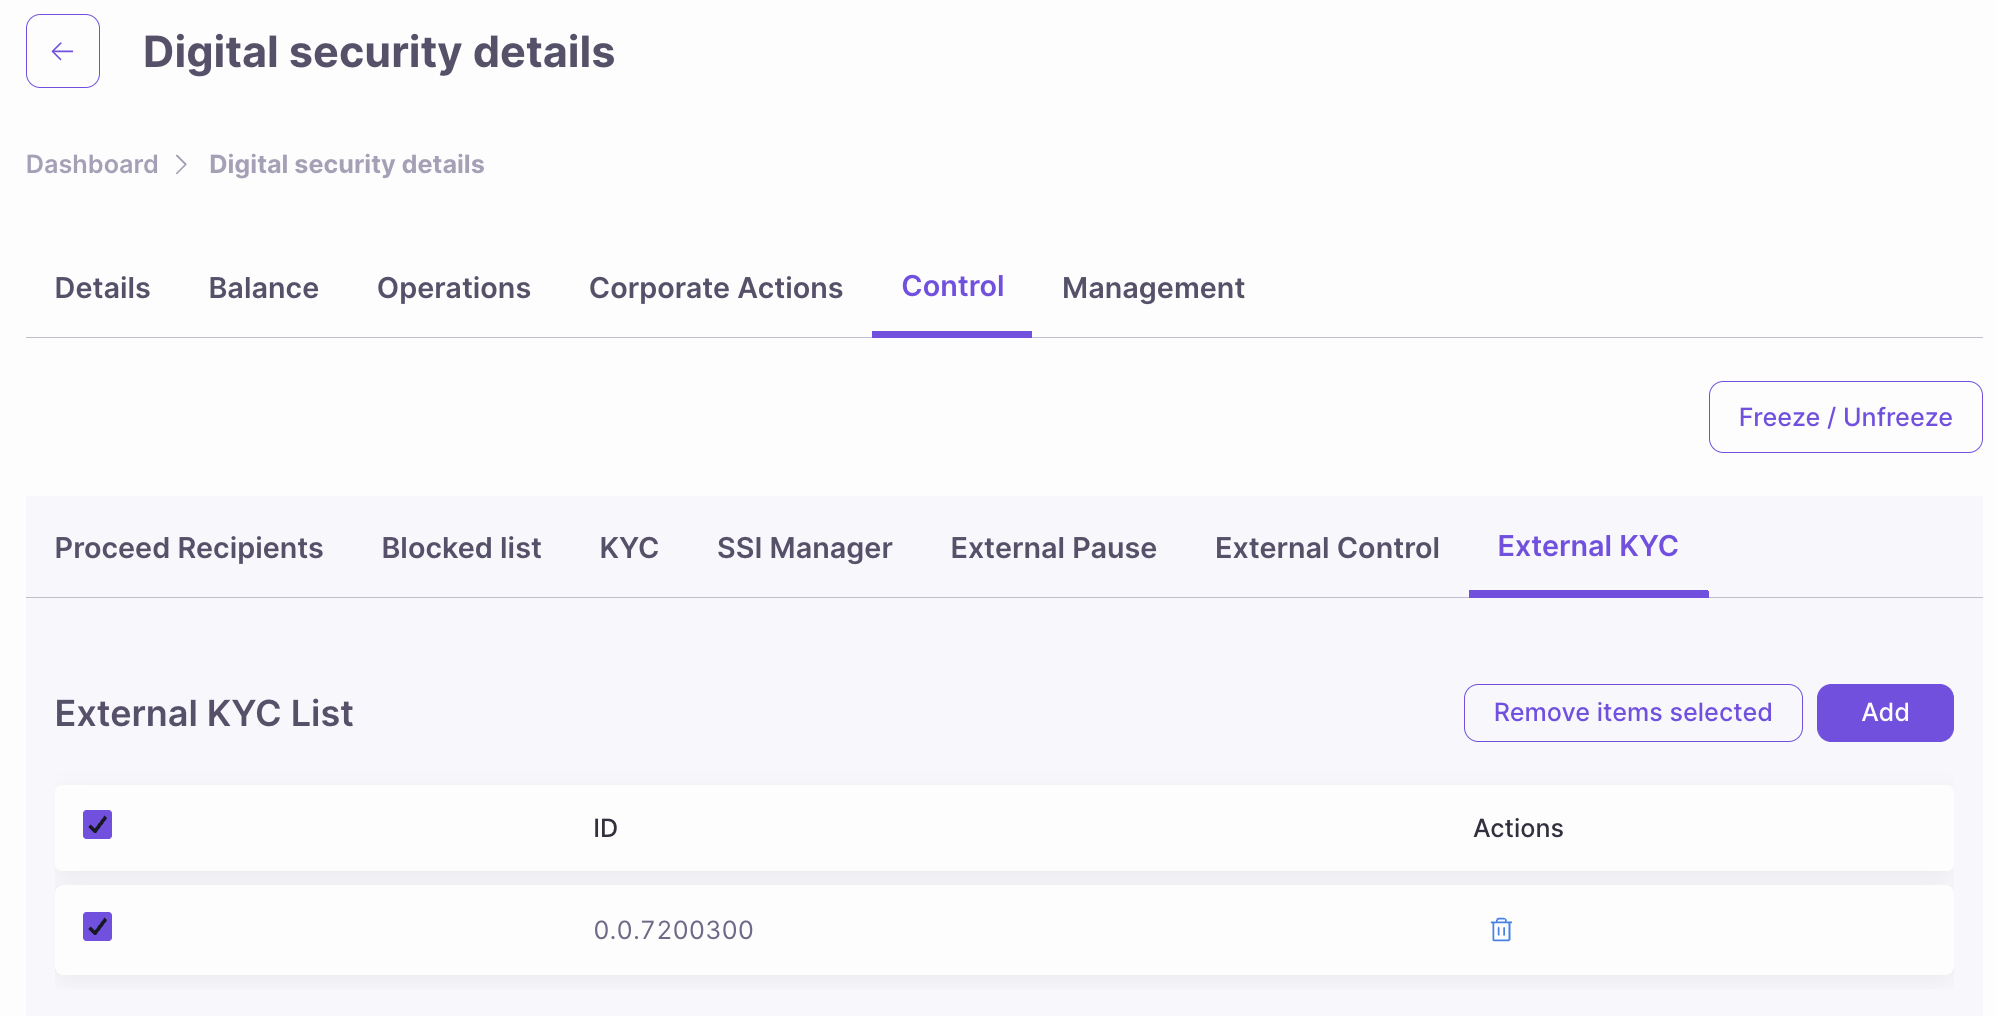
Step 3: Link to Your Token
- Go to your token’s detail page
- Navigate to the External KYC tab
- Click Add External KYC
- Select your external KYC contract
- Click Add
- Sign transaction
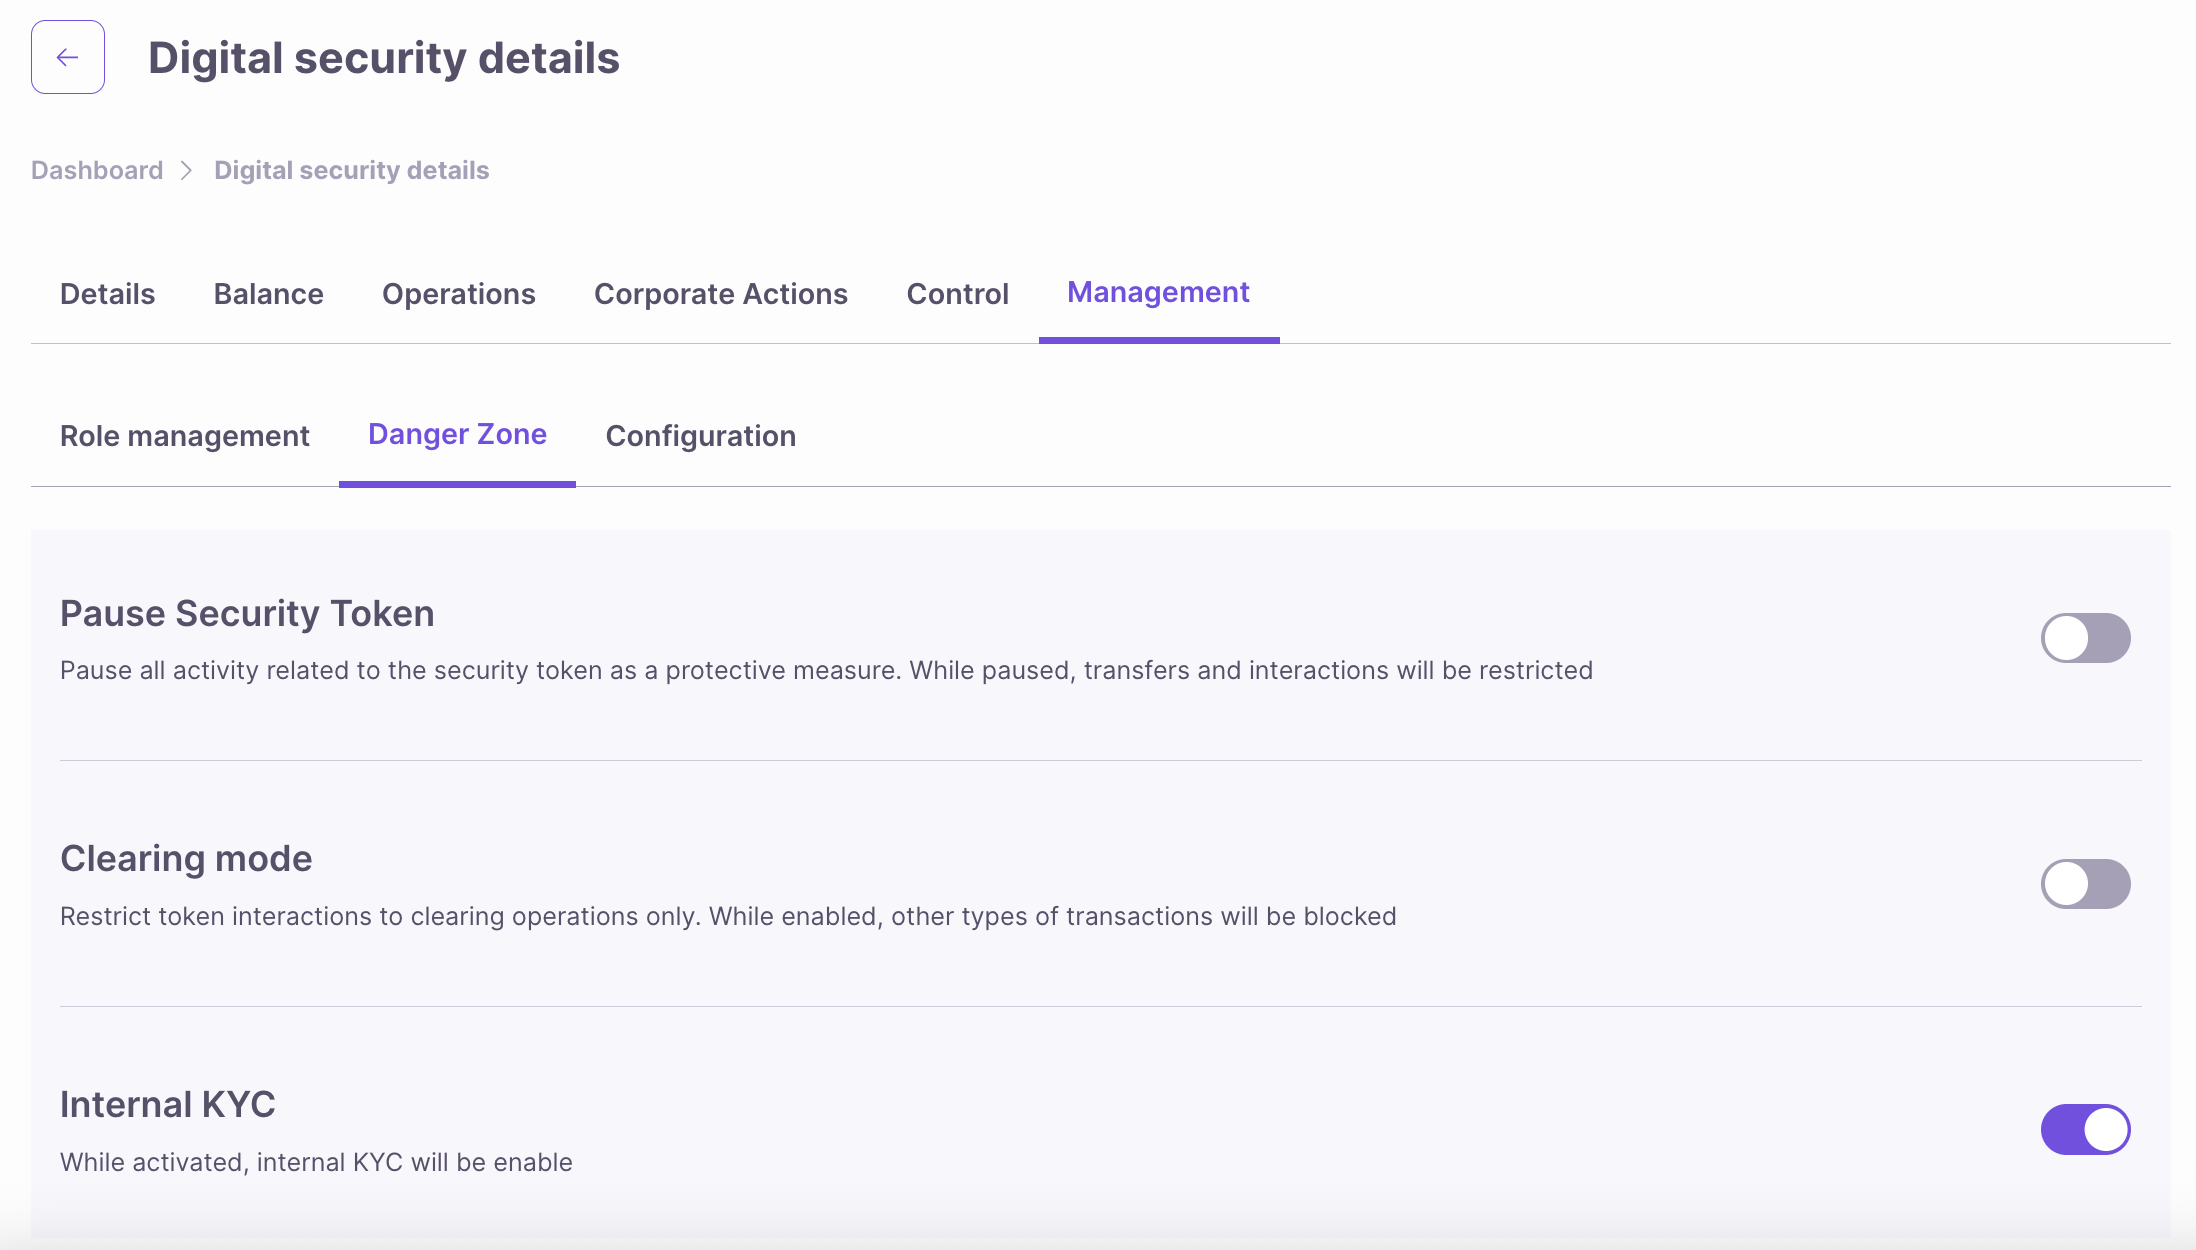
Internal KYC with VC Files
Step 1: Enable Internal KYC (if not already done during Token creation)
- Go to token detail → Danger Zone
- Toggle Internal KYC to Active
Step 2: Add Yourself as SSI Issuer
What is an SSI Manager/Issuer? The SSI Manager manages the list of trusted issuers * entities authorized to sign Verifiable Credentials (VCs) that your token will accept for KYC purposes. Think of it like a whitelist of “trusted KYC providers.”- SSI Manager Role (
SSI_MANAGER_ROLE): Can add/remove trusted issuers - Issuer: An account that signs Verifiable Credentials
- Can be you (self-issued KYC)
- Can be a KYC service
- Can be a financial institution (bank, broker)
- Can be a regulatory authority
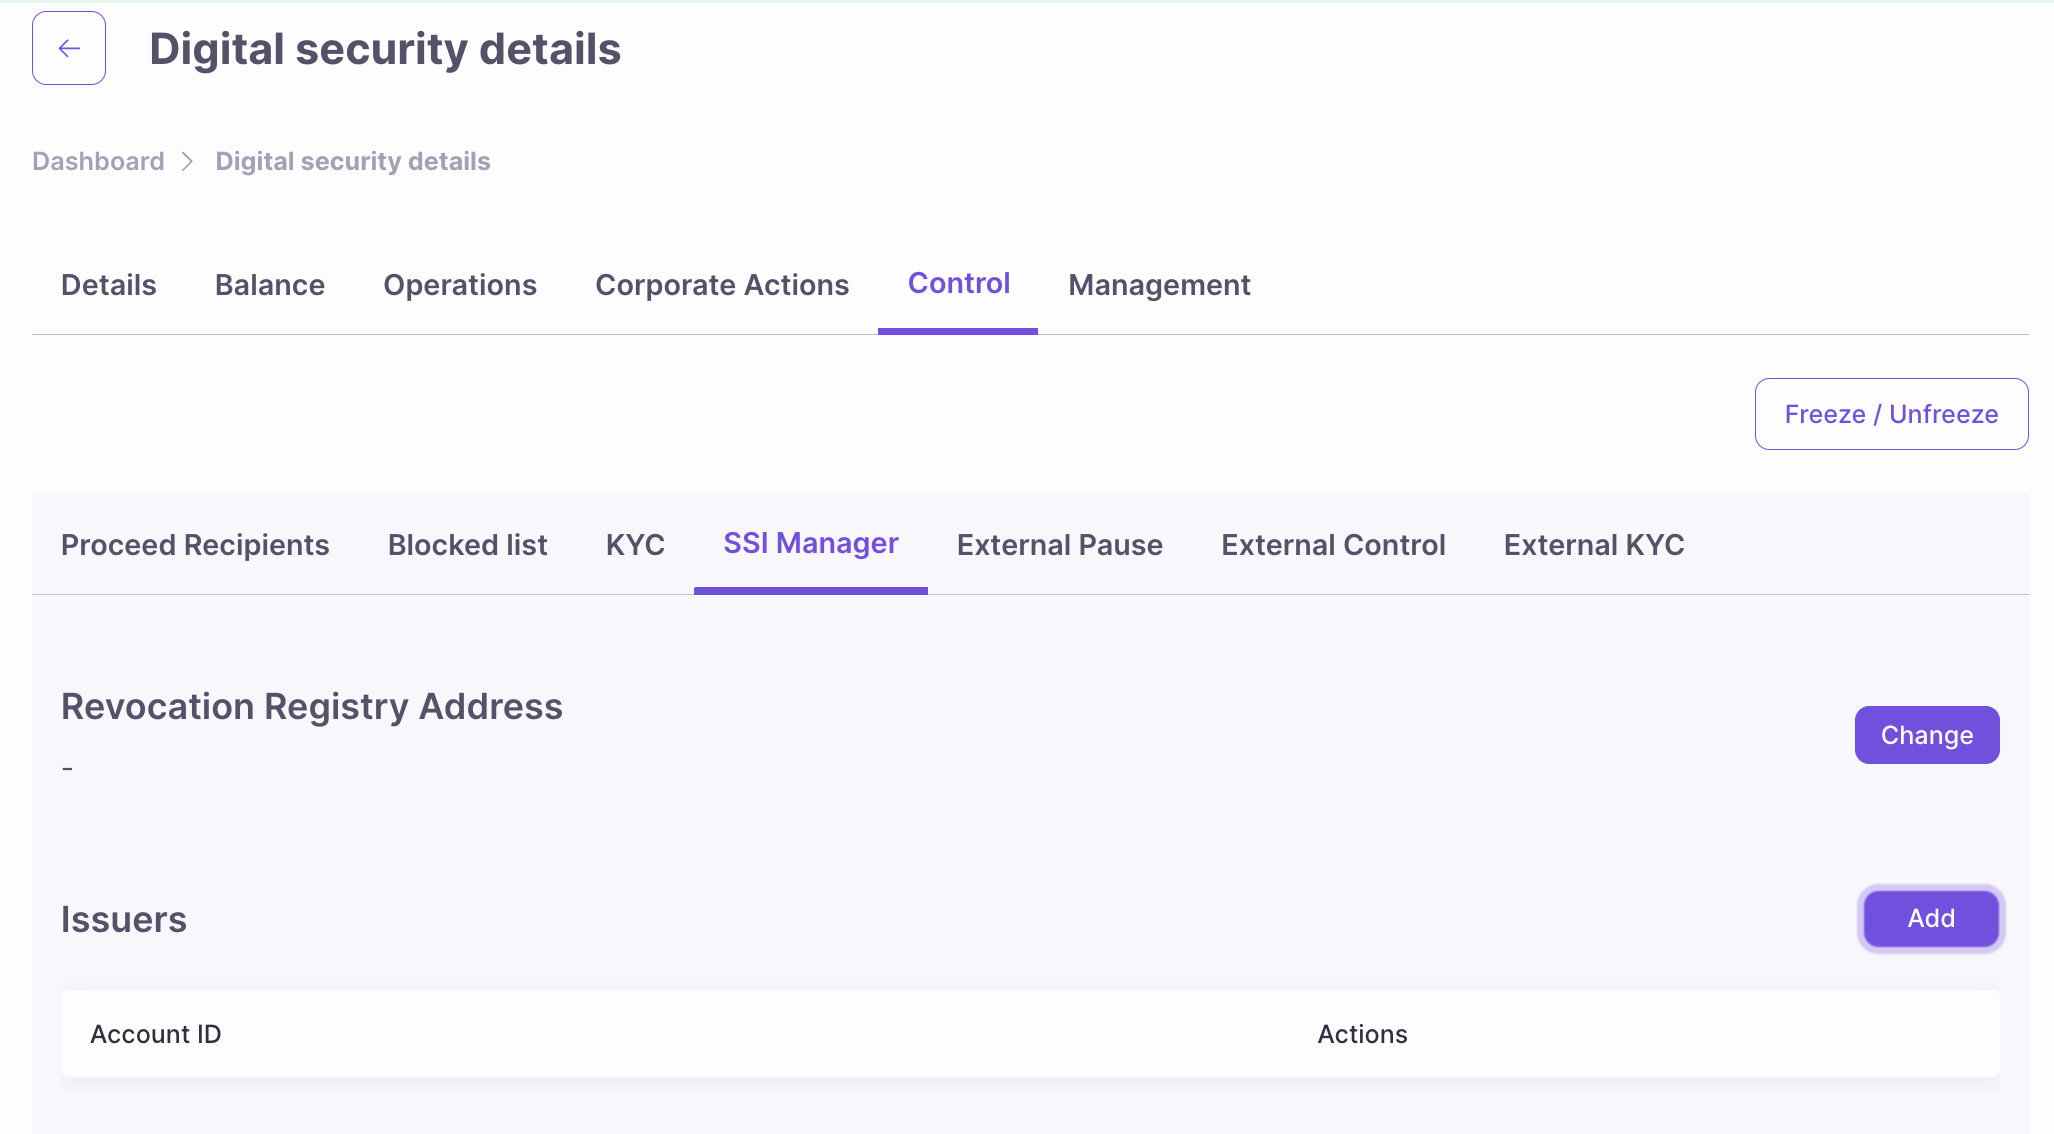
- Make sure you have assigned yourself the SSI Role under ‘Roles’
- Go to token detail → SST Manager tab
- Click Add Issuer
- Enter your Hedera Account ID:
0.0.xxx(the account that will sign VCs) - Click Add
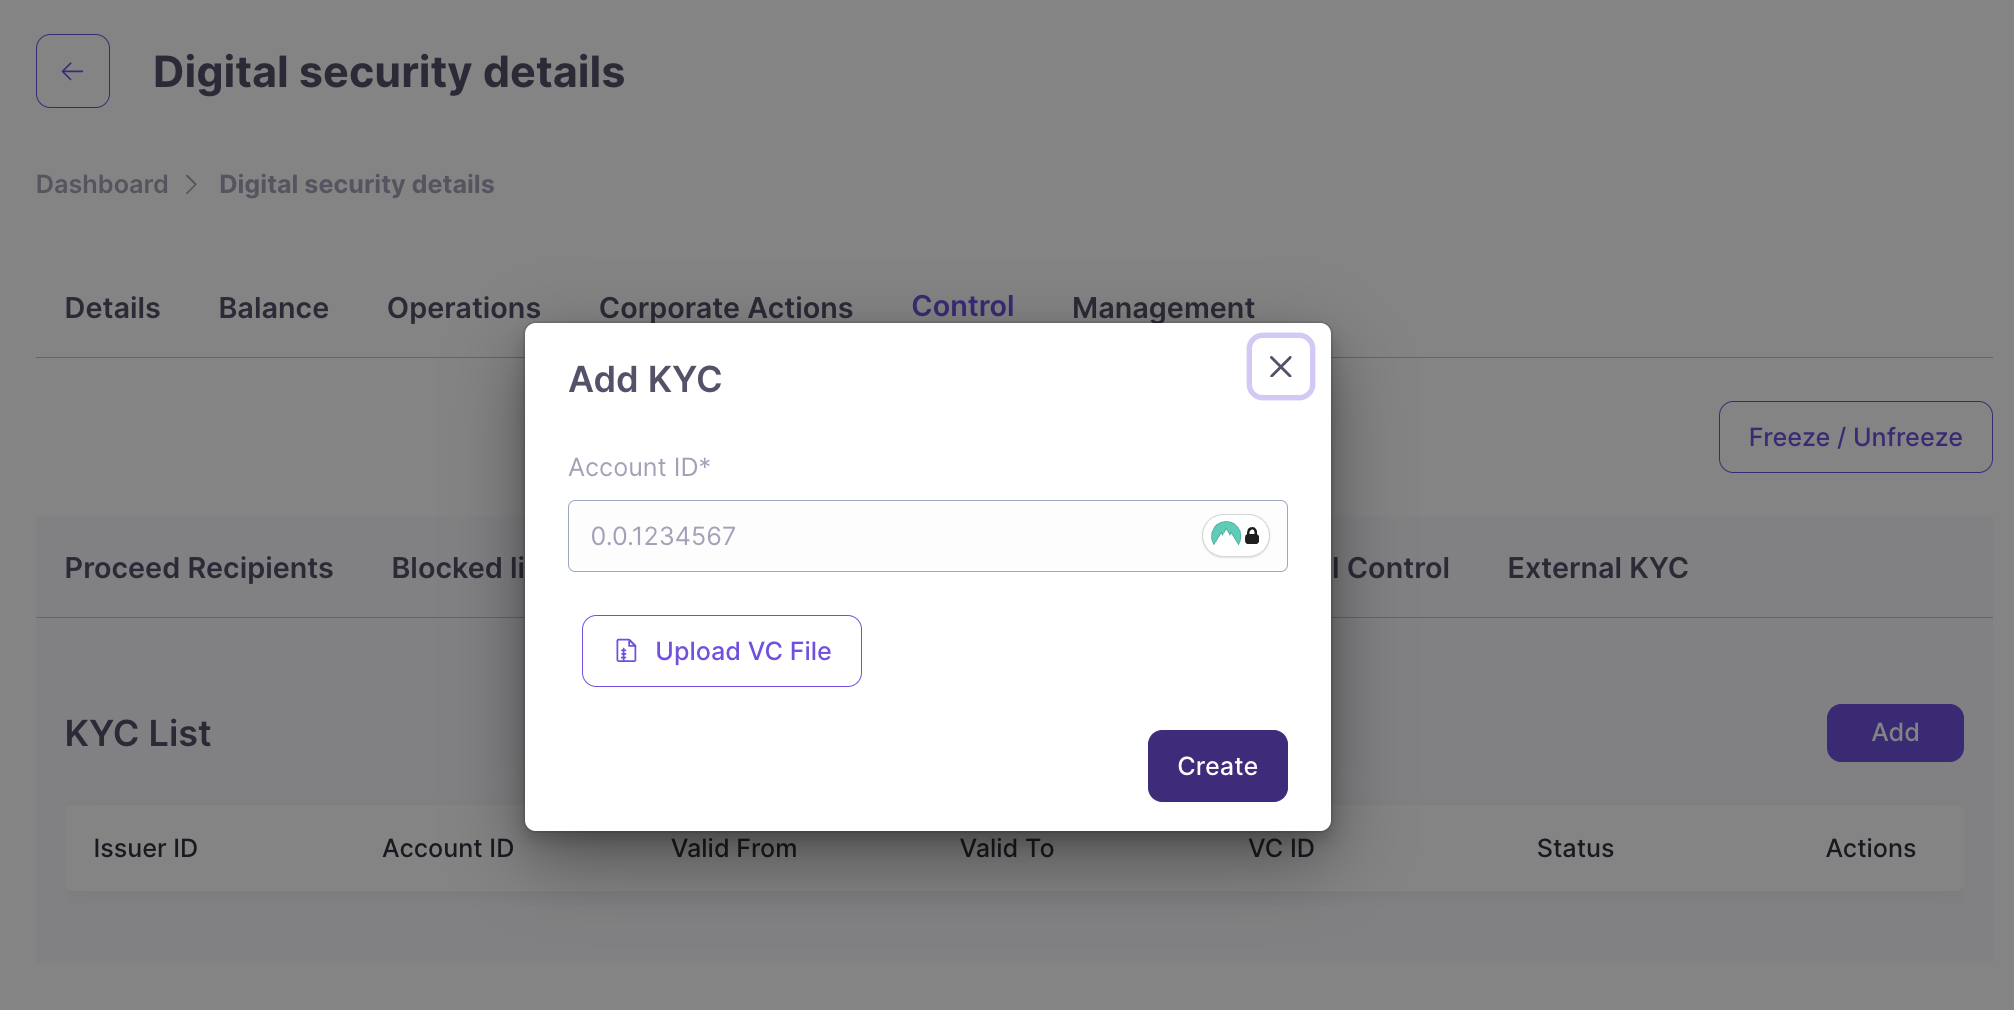
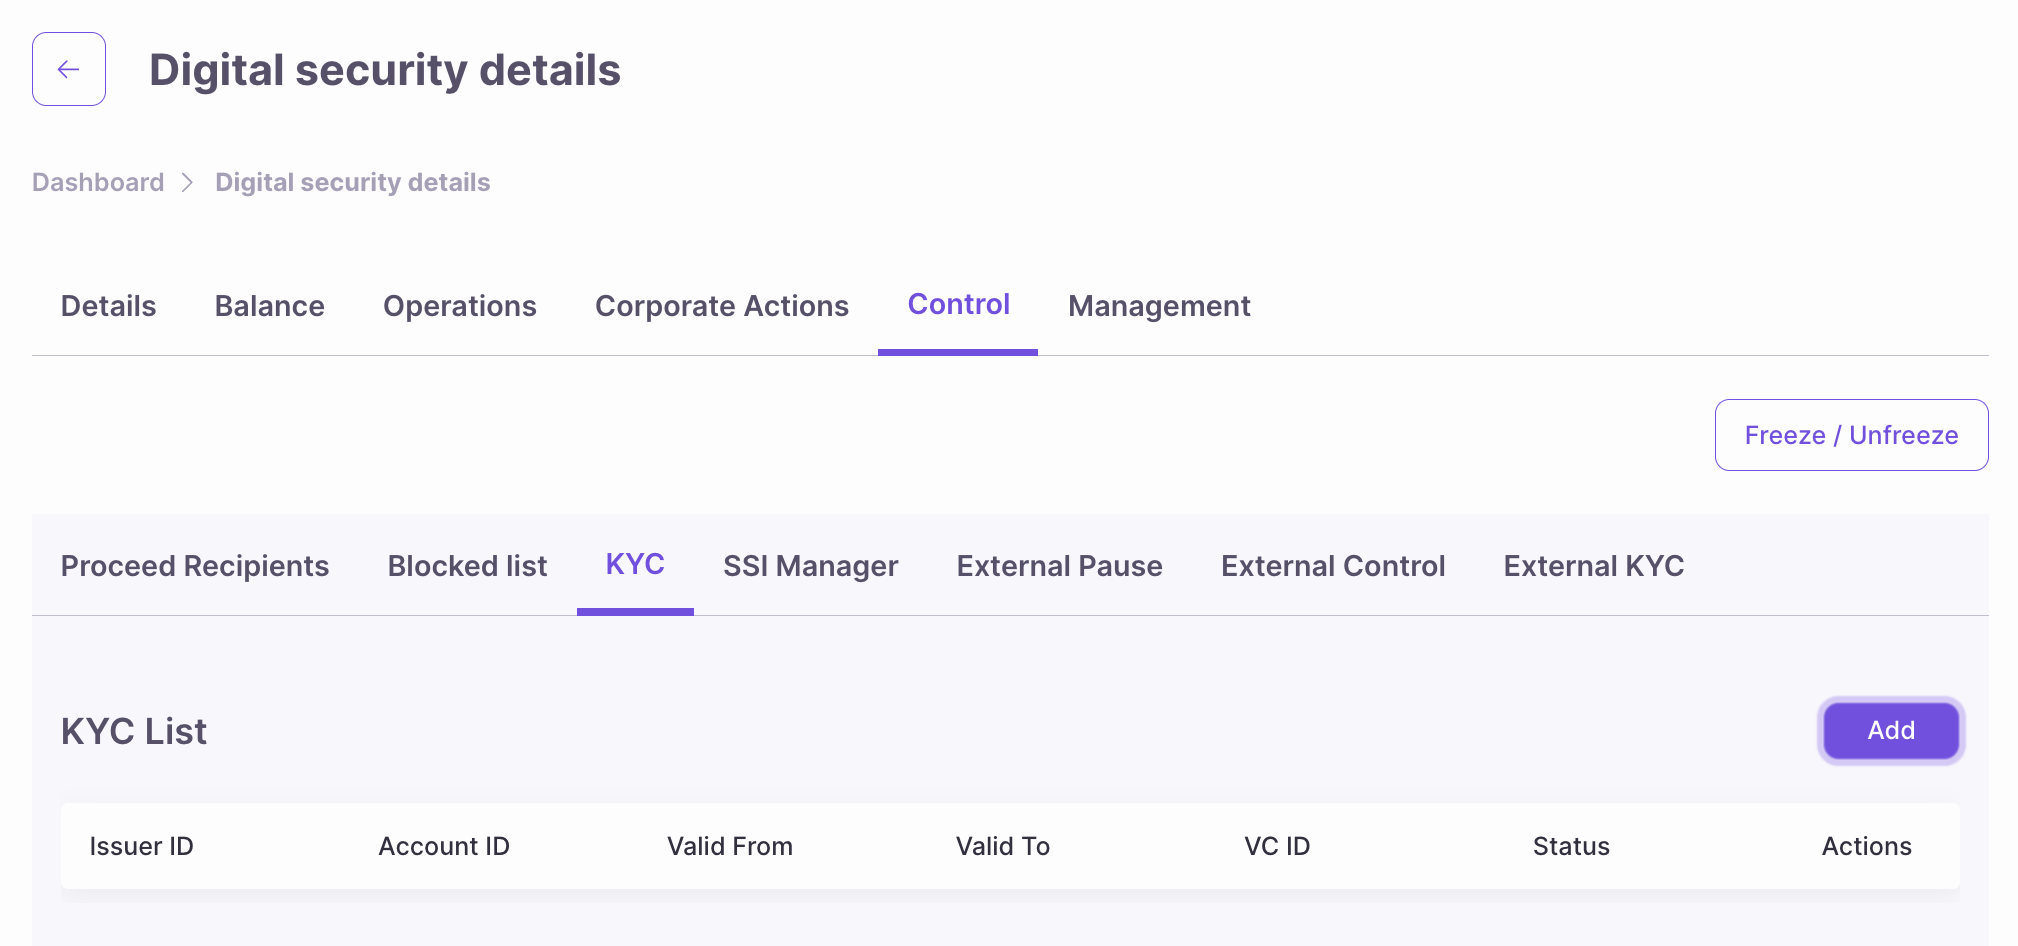
Step 3: Grant KYC via UI
- Go to token detail → KYC tab
- Click Add button
- Fill Form:
- Account ID:
0.0.1234567 - VC File: Upload the
.vcfile (can be generated in the ATS repository - needs hardhat)
- Account ID:
- Click Create
- Sign transaction